Categories
iOS Security Uncategorized

Reverse Engineering the DirecTV App’s DVR Authentication

Disclaimer: The work below was done nearly a year ago. I have no way to test to see if the information is still accurate. I’m guessing it is, but if you’re able to check and see, feel free to let me know if you still get the same results I did.

A while back a friend came to me and they were interested in writing their own mobile app to control their DirecTV DVR. DirecTV already had its own mobile app, but this person wanted to be able to customize some of the behavior. The existing app gave us a good starting point to try and see how to communicate with the DVR.

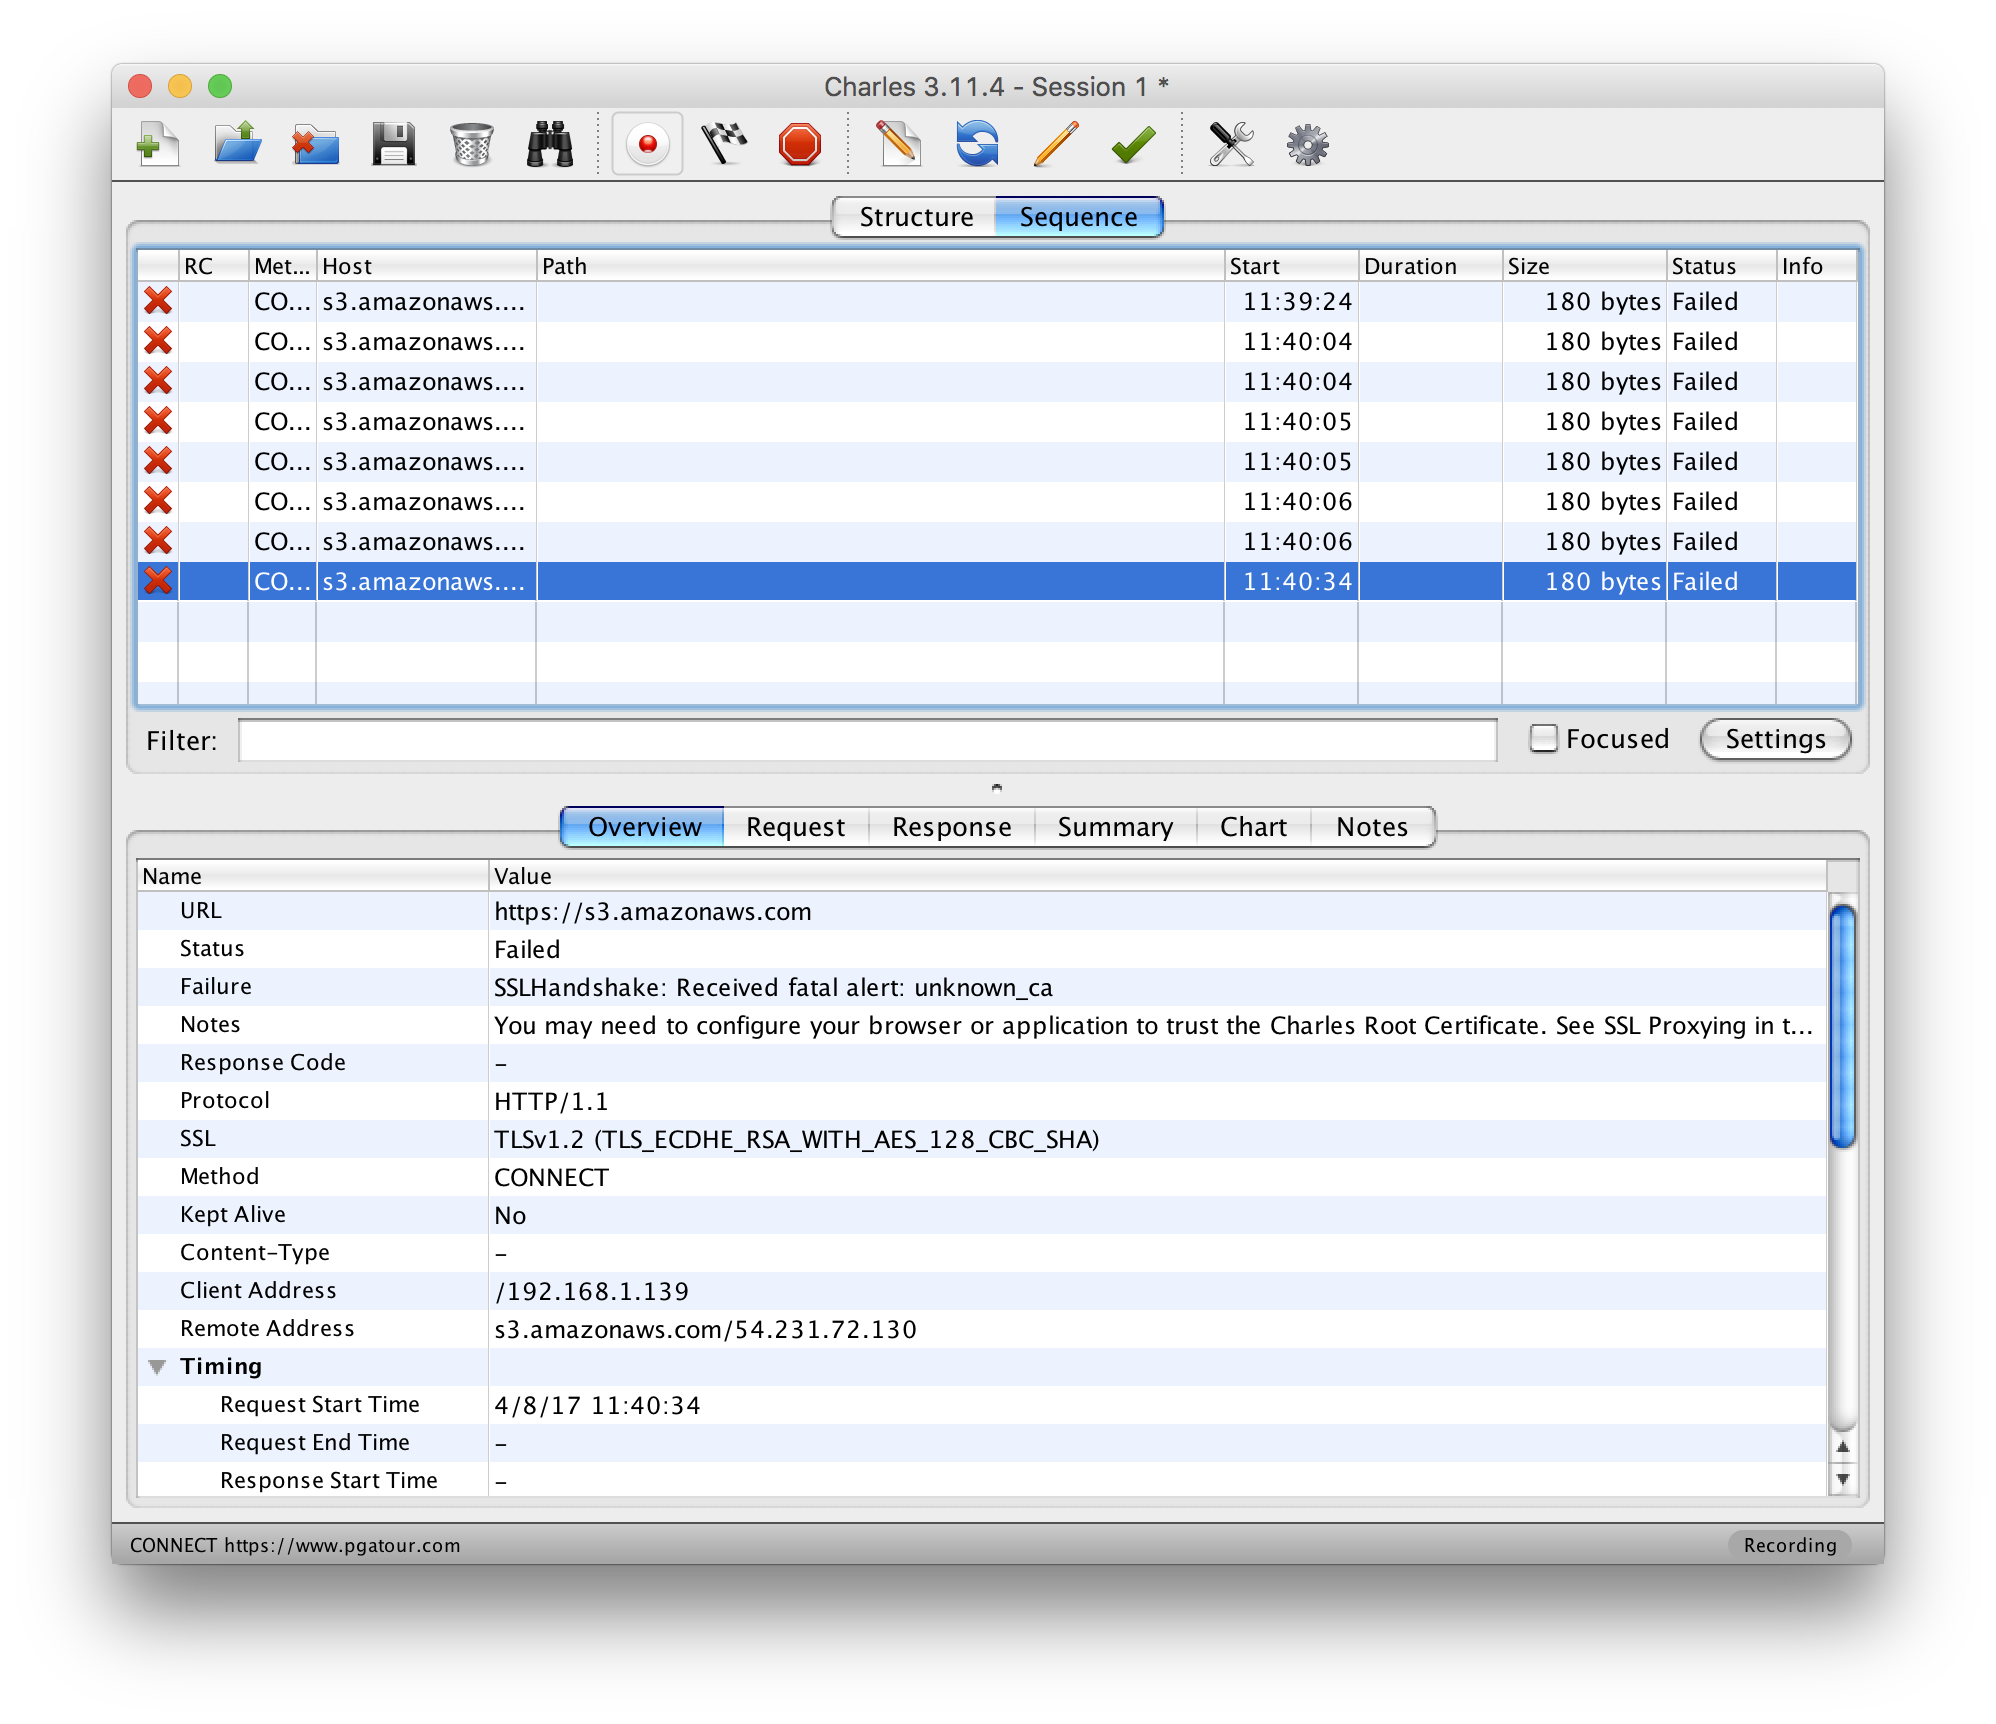
The first place to start was to inspect the local network traffic between the mobile app and DVR. Any proxying tool should work; I went with Charles Proxy. When doing this, we observed an interesting pattern with the traffic. Every time the app sent a request to the server, the server would respond 401 Unauthorized. The app would then send a second request, identical to the first, but this time with an Authorization header. The server would accept this second request and respond. This wouldn’t just happen once at the beginning of a session. Every single request would get a 401 the first time, then would be resent with Authorization headers.

Inspecting the server’s 401 response, it contained a WWW-Authenticate header which included four keys: realm, Qop, Nonce, and Opaque. A quick online search of these keys revealed that the server seemed to be issuing a digest authentication challenge.

A digest authentication challenge is part of digest access authentication; an authentication method that can be used with web servers. The way digest authentication works is that the client and server each know a pre-shared secret (a password). When the server responds to a client with a digest authentication challenge, it’s telling the client how to authenticate itself. The client will generate two strings:

string1 = md5(username:realm:password)
string2 = md5(method:digestURI)

These two strings are then used by the client to generate the authentication response:

response=md5(string1:nonce:nonceCount:cnonce:qop:string2)

If we wanted to talk to this DVR server, we needed to figure out how to authenticate ourselves. In order to authenticate our response we needed a username, realm, password, method, digestURI, nonce, nonceCount, cnonce, and qop.

As mentioned above, the server’s challenge response gave us the realm, qop, and nonce. From the client’s plaintext HTTP response we were also able to obtain the username (c0pi10t), method (GET), and digestURI (path in the requested URL).

This left us still needing the password, nonceCount and cnonce. The cnonce is an arbitrary value chosen by the client (us!) and the nonceCount can just always be 00000001. So really all that was left was the password. The password is the very thing that makes digest authentication secure. The client and server ship with the shared password known to both of them, so they never have to transmit it over the wire.

In order to obtain the password, one option was to try brute force. Digest authentication is used with SIP, for which a couple of brute forcing tools already exist. However, if the password being used is sufficiently complex, brute force is impractical. I took an existing tool and tweaked it a bit to at least start a brute force script while working on some other ideas.

While that ran, I attempted to inspect the application binary itself. Sometimes developers do silly things and leave files around with interesting information, store secret values in insecure places, or don’t bother to obfuscate strings in their binary. Knowing the username gave me a known value to search for. Unfortunately, cursory searches didn’t reveal any clues inside the binary and couldn’t even find a match for our username, so they seemed to at least be doing something to obfuscate the strings in the application binary.

I also decided to start skimming through the digest access authentication RFC (RFC 2069). Looking through the table of contents, one section immediately jumped out: Security Considerations. This section covered some of the benefits that digest access authentication has over basic auth, as well as possible attacks.

Section 3.3 – Man in the Middle – A simple but effective attack would be to replace the Digest challenge with a Basic challenge to spoof the client into revealing their password.

https://tools.ietf.org/html/rfc2069

The RFC also goes on to explain how this could be combatted. The developers are likely to have coded the client to only respond to digest authentication challenges, and ignore challenges asking for basic auth. The client knows that the server will be using digest authentication and there’s no reason it should accept basic auth as a challenge, especially when an RFC that’s over 20 years old clearly outlines this attack. But it never hurts to try.

Once again using Charles Proxy, when the client tried an unauthenticated request and the server responds with a digest challenge, we modified the response to have a “WWW-Authenticate: Basic” header, indicating to the client that it should authenticate itself with Basic auth (base64 encoded username and password).

When we tried this, much to our surprise, the client actually responded to our spoofed request with Basic Auth. It’s a base64, colon-delimited string, which decoded gives us: c0pi10t:8th5Bre$Wrus. We already had the username (the first part), and now we also had the password.

At this point the door is pretty wide open for writing our own client that can talk to the DirecTV DVR. We have all the pieces we need to authenticate all of our requests to the DVR so that it believes it’s talking to the official DirecTV mobile app. And not just this specific DVR, but any DirecTV DVR that’s capable of working with the mobile app. Based on my (very novice) understanding of digest access authentication, the password must be the same for any DVRs that want to work with the mobile app.

Categories
Uncategorized

These Aren’t Your Dad’s UDIDs

Throw everything you thought you knew about Apple UDIDs out the window. Historically, Apple’s UDIDs have always been a hexadecimal string exactly 40 characters long. Last week, Apple released new hardware. Most notably the iPhone XS, iPhone XS Max, and iPhone XR. On those new devices, they seem to have changed the format of UDIDs. They are now a string of 8 characters, then a hyphen followed by 16 more characters. XXXXXXXX-XXXXXXXXXXXXXXXX

I have no idea why they’d make such a change. It will likely have little to no impact on developers. We use an internal tool that checked the length of a string to determine if the UDID was from an iOS device or an Android device. It made the (now incorrect) assumption that an iOS UDID would be always be exactly 40 characters long. I imagine people may have other pieces of software out there that they’ve written with this same assumption for one reason or another, who will also run into problems. But beyond that, this change is mostly just an oddity for us to “huh” at.

Categories
iOS Networking Tools

Trusting Custom Root Certificates on iOS 10.3

TL;DR: Navigate to Settings > General > About > Certificate Trust Settings and turn the switch on for your custom certificate.

Like many, Charles Proxy has become an indispensable part of my daily toolkit. Every person on my QA team uses it daily for their projects. Recently while testing on iOS 10.3, one of my team members couldn’t get his SSL traffic to proxy. Usually when somebody runs into this, it’s because the person hasn’t installed the Charles Proxy root certificate on the device they’re trying to proxy. Then why you try to proxy SSL traffic in Charles you’ll the following error: SSLHandshake: Received fatal alert: unknown_ca

Charles Proxy will even offer a helpful suggestion:

You may need to configure your browser or application to trust the Charles Root Certificate. See SSL Proxying in the Help menu.

iOS is refusing the SSL handshake because the certificate authority that has issued the SSL certificate being used is not in its Trust Store. Previously to resolve this, we would just need to go to http://ssl.charles in Safari on the device, and we could then install the root CA from Charles and tell the device we want to trust it. In this case, the QA person had already taken these steps. After some digging around, he found the problem. Settings > General > About > Certificate Trust Testings

The Charles Proxy Custom Root Certificate that he had installed showed up in the list, but its toggle was turned off. While this section existed prior to iOS 10.3, by default when you would install a custom certificate, iOS would implicitly trust it. No further action required. As of iOS 10.3, the default for new custom certificates is to not trust them. If you want to trust the custom certificate you’ve installed (why else would you have installed it?), you’ll need to navigate to the section mentioned above and manually turn the switch on to trust the certificate. Any certificates installed and trusted prior to iOS 10.3 seem to be grandfathered in, so you won’t run into this until you’re trying to use a new root certificate.

Categories
iOS Networking Privacy Security

Network Security Changes Coming to iOS

Changes to App Transport Security

Last year, with iOS 9, Apple introduced App Transport Security; an enforcement of best practices for encrypted networking. By default, App Transport security requires the following:

  • NSURLSession and NSURLConnection traffic be encrypted
  • AES-128 or better and SHA-2 used for certificates
  • TLS v1.2 or higher
  • Perfect forward secrecy
In other words, it requires that your app keep your users’ network traffic reasonably protected.

While enabled by default in iOS 9, Apple recognized that may developers don’t control their backends, and included the ability to set exceptions for App Transport Security. The problem is many developers went right for the NSAllowsArbitraryLoads key, which disables ATS entirely, then never bothered to re-visit their configuration to get everything working nice and securely.

Last week, at WWDC 2016, Apple announced that beginning January 1, 2017, App Transport Security will be required (this topic starts about 1m20s into the What’s New In Security session). You should really watch the talk for the exact details from Apple, but in short, all of your app’s traffic needs to be secured with HTTPS and will need to use TLS v1.2 or higher.

Apple will still allow some exceptions, but the rules will be much less relaxed than they have been:

  • Most exceptions will now need to be justified to Apple. NSAllowsArbitraryLoads, NSExceptionAllowsInsecureHTTPLoads, and NSExceptionMinimumTLSVersion will all require a reasonable justification for use.
  • NSExceptionRequiresForwardSecrecy will not require a justification for now. If used, this exception will be granted automatic approval. Presumably this will change down the road as forward secrecy becomes more widely spread.
  • Streaming media using AVFoundation is exempt, but Apple says you should still encrypt with TLS if possible.
  • Content loaded inside of WKWebView does not have to be encrypted. This requires specifying the NSAllowsArbitraryLoadsInWebContent key as true in your Info.plist.
  • Data that is already encrypted does not have to go over HTTPS.
The specific example Apple uses in the talk for still needing exceptions is communicating with a third-party server where you can’t control their cipher suites. Even if this is your situation, it sounds like needing to justify exceptions may slow review time, so it’s probably worth talking to any third parties you work with to ensure they can meet ATS requirements.

If the reason you haven’t supported ATS yet is because it seemed like too much work, now’s the time to start making changes. One of the difficulties you may face implementing ATS is diagnosing failures. On the surface, you’ll likely just see data fail to load in your app with no real indication as to why. What I’ve found most useful is the nscurl --ats-diagnostics https://example.com command. It will test different ATS configurations against the specified domain and report back showing which scenarios pass and which fail. The failed scenarios will make it much more clear what you need to change on your server to support ATS. Tim Ekl has some more helpful info about debugging in this blog post on ATS from last year.

If the reason you don’t yet support ATS is the cost or difficulty of getting set up with SSL certificates, be sure to check out the Let’s Encrypt project. Let’s Encrypt is a free, automated Certificate Authority that operates with support from a large number of sponsors such as Mozilla, the EFF, Chrome, and Cisco.

Certificate Transparency

Certificate Transparency is a standard for monitoring and auditing certificates (TLS certificates in this case). Its purpose is to help protect against fraudulently issued certificates. Last year when Apple went over App Transport Security, they also briefly covered the ability to require certificate transparency in apps using the NSRequiresCertificateTransparency key, though they said this functionality was off by default.

This year, certificate transparency is still not required, but Lucia Ballard spent several minutes discussing it in the same What’s New in Security session, announcing that Apple is “joining the effort for certificate transparency”. She also took some time to cover OCSP stapling—a method for checking to see if a certificate has been revoked—and presents it as a recommended practice. I think the verbiage used around Certificate Transparency and OCSP stapling is noteworthy. I’ll include the text of two quotes from the session here for your consideration:

We think now is the time for folks to move to it and start adopting [OCSP stapling].

And later:

It would be a great time to start experimenting with certificate transparency, find certificate authorities that are participating, and get integrated into this ecosystem. And please go enable OCSP stapling.

I strongly encourage everybody to go watch, at a minimum, the certificate transparency portion of the What’s New in Security session from WWDC 2016. It’s less than 10 minutes long, starting at 7m55s and ending at 16m00s (though really you should watch the entire session). The speaker gives a great overview of both Certificate Transparency and OCSP stapling. They also recommend certificate-transparency.org as a developer resource on the subject.

Updating your apps

Your first priority should be to get your app ATS compliant before the January 1st deadline. Really you should start now because many developers are going to encounter obstacles in doing so. Don’t procrastinate.

Once you have ATS working, it seems like it will be worth your time to start getting familiar with certificate transparency and OCSP stapling. Not only will this benefit the security of your users, but it may make your life easier down the road should Apple choose to encourage its adoption more strongly.

Categories
iOS Mac Privacy Security

Working with Apple’s App Transport Security

Update 6/23/15: Apple now has official documentation for App Transport Security.

With iOS 9 and OS X El Capitan, Apple has introduced App Transport Security. In a nutshell, App Transport Security enforces best practices for secure network connections — notably, TLS 1.2 and forward secrecy. In the future, Apple will also update these best practices to ensure they always reflect the latest security practices that will keep network data secure.

App Transport Security is enabled by default when using NSURLSession, NSURLConnection, or CFURL in iOS 9 or OS X El Capitan. Unfortunately for many developers this may mean that things break as soon as they build for iOS 9 or OS X 10.10. Fortunately Apple offers some configuration options to leverage App Transport Security where possible, while disabling it in places where you cannot support it.

You can opt-out of ATS for certain URLs in your Info.plist by using NSExceptionDomains. Within the NSExceptionDomains dictionary you can explicitly define URLs that you need exceptions for with ATS. The exceptions you can use are: NSIncludesSubdomains
NSExceptionAllowsInsecureHTTPLoads
NSExceptionRequiresForwardSecrecy
NSExceptionMinimumTLSVersion
NSThirdPartyExceptionAllowsInsecureHTTPLoads
NSThirdPartyExceptionMinimumTLSVersion
NSThirdPartyExceptionRequiresForwardSecrecy
Each of these keys allows you to granularly disable ATS or particular ATS options on domains where you are unable to support them.

Sample ATS plist

In the first beta of iOS 9, these keys are incorrect and instead you’ll need to use the following: NSTemporaryExceptionAllowsInsecureHTTPLoads
NSTemporaryExceptionRequiresForwardSecrecy
NSTemporaryExceptionMinimumTLSVersion
NSTemporaryThirdPartyExceptionAllowsInsecureHTTPLoads
NSTemporaryThirdPartyExceptionMinimumTLSVersion
NSTemporaryThirdPartyExceptionRequiresForwardSecrecy

These keys will undoubtedly be fixed in a future seed. If you can, you should use the first set of keys above that Apple is officially supporting, though if you’re using the temporary keys, they should continue to work in future betas. Thanks to Juan Leon for bringing this to my attention—I was told the same in the labs.

Below are examples of different scenarios developers may encounter.

Example A: ATS for all

This is the easiest one. The only thing you need to do is use NSURLSession, NSURLConnection, or CFURL. If you’re targeting iOS 9 or OS X El Capitan or later, ATS’s best practices will apply to all of your NSURLSession, NSURLConnection, and CFURL traffic.

Example B: ATS for all, with some exceptions

If you expect all of your domains to work with ATS, except a few that you know will not work, you can specify exceptions for where ATS should not be use, while leaving all other traffic opted in. For this scenario, you’ll want to use an NSExceptionDomains to specify the domains for which you wish to override ATS’s default settings. To opt-out an entire domain or sub-domain, create a dictionary for the URL you want to opt-out of ATS, then set NSExceptionAllowsInsecureHTTPLoadsto true. You can also specify more specific rules you wish to override with NSExceptionRequiresForwardSecrecy and NSExceptionMinimumTLSVersion if you don’t want to completely disable ATS on those domains.

ATS for All

Example C: ATS disabled, with some exceptions

Conversely, you may only want ATS to work on domains you specifically know can support it. For example, if you develop a Twitter client, there will be countless URLs you may want to load that may not be able to support ATS, though you would want things like login calls, and other requests to Twitter to use ATS. In this case you can disable ATS as your default, then specify URL which you do wish to use ATS.

In this case you should set NSAllowsArbitraryLoads to true, then define the URLs that you want to be secure in your NSExceptionDomains dictionary. Each domain you wish to be secure should have its own dictionary, and the NSExceptionAllowsInsecureHTTPLoads for that dictionary should be set to false.

ATS Disabled with Exceptions

Example D: Downgraded ATS

In some cases you may want ATS on all, or some, or your URLs, but are not ready to fully support all of ATS’s best practices. Perhaps your servers support TLS1.2, but don’t yet support forward secrecy. Rather than completely disabling ATS on the affected domains, you can leave ATS enabled, but disable forward secrecy. In this scenario you would create an NSExceptionDomains dictionary, a dictionary entry for each domain you need to override settings for, then set the NSExceptionRequiresForwardSecrecy value to false. Similarly, if you wish to have forward secrecy enabled, but need the minimum TLS version to be lower, you can define your supported TLS version with the NSExceptionMinimumTLSVersion key.

Downgraded ATS

Example E: NSA-friendly Mode

If you want to opt-out of ATS entirely (which you really shouldn’t do unless you fully understand the implications), you can simply set NSAllowsArbitraryLoads to true in your Info.plist.

NSA-friendly Mode

Third-party keys

You may have noticed a few keys that appear to be duplicates of others keys with the addition of “ThirdParty” in the name. NSThirdPartyExceptionAllowsInsecureHTTPLoads
NSThirdPartyExceptionMinimumTLSVersion
NSThirdPartyExceptionRequiresForwardSecrecy
Functionally these keys will have the same result as the keys that don’t have “ThirdParty” in them. The actual code being invoked behind the scenes will be identical regardless of whether you use the ThirdParty keys or not. You should probably use whichever key best fits your exceptions, but no need to overthink it.

Certificate Transparency

While most security features for ATS are enabled by default, certificate transparency is one you must opt-in to. If you have certificates which support certificate transparency, you can enable certificate transparency checks with the NSRequiresCertificateTransparency key. Again, if your certificates don’t yet support certificate transparency, by default this check will be disabled.

If you need help debugging issues that arise from having App Transport Security enabled, setting CFNETWORK_DIAGNOSTICS to 1 will log all NSURLSession errors including the URL that was called and the ATS error that resulted. Be sure to file radars for any issues you encounter so that ATS can be improved and flexibility expanded.

All of the above information was provided in Apple’s Networking with NSURLSession session at WWDC 2015. Finally, Apple emphasized in the talk to report any issues that you run into and keep any eye out for any changes that may be coming in future betas.

Categories
Mac Tools

Simple Script for Getting a Device’s UDID

When I need to grab a device’s UDID, it has always felt heavy to me to have to launch iTunes or Xcode just to get a simple 40-character string. After years of sighing about it, I finally did something. Below is a simple bash script that uses mac OSes system_profiler command to grab the UDIDs of any iOS devices connected to your computer. It will print all UDIDs to your terminal’s stdout and copy the last UDID to your clipboard for easy pasting.

Updated 9/24/18 to detect new 24 character UDIDs and insert a hyphen where Apple expects one.

Categories
Uncategorized

iOS 8 Location Services PSA

When Apple announced their changes to Location Services in iOS 8 at WWDC this year, a couple of things jumped out as being potentially problematic for developers (as well as users). I wrote about the changes in-depth on iMore back in June, but now that iOS 8 is out, and the changes are causing some confusion for people, I think it’s time to revisit them and discuss possible problems.

There are now two types of permission you can ask for with Location Services: Always and When In Use. I won’t go over which each one means here, but refer to the screenshot from WWDC below for a quick guide on which type your app will need. Any apps built for iOS 7 will default to asking for Always permission when run on iOS 8. This means your users will see a new, scary alert telling them that your app is monitoring their location even when they’re not using it. It also means even after a user has said yes, iOS will ask them again after a few days if they want to continue to allow your app to access their location even when not in use. For some apps this is fine. For others, users will panic and disable the permission. For this reason it’s important to push an update to properly handle Location Service permission on iOS 8. It’s also a healthy reminder to ensure your app will fail gracefully when users deny your app access to their location.

iOS 8 Location Services Matrix

The other important thing for developers to understand is the new requirements for prompting users for their location. If you don’t do this correctly, users will not get prompted to allow Location Services. I’ve seen and heard of a number of developers spinning their wheels when they run into this. It’s insidious because your user will not see any indication that something didn’t work, and Xcode doesn’t do a great job of telling developers when they’ve screwed this up. You are now required to define Location Services description strings in your Info.plist. If you request permission for Location Services and don’t have this set up properly, iOS won’t even bother prompting users.

Maps asking for permission in iOS 8

The two keys to concern yourself with are NSLocationAlwaysUsageDescription and NSLocationWhenInUseUsageDescription. The values of these keys are the text that iOS will present to users in the Location Services alert when it prompts a user to give your app access. This is where you need to succinctly explain to your users why you need to know their location. If you only define one of these, but your app asks for the other type of permission, iOS won’t prompt the user.

Xcode Info.plist

You’ll also need to update your code to call requestAlwaysAuthorization or requestWhenInUseAuthorization when you want to ask the user for permission before attempting to call startUpdatingLocation.

Also be mindful of any third-party SDKs you’re using that might request Location Services before you do. Your app gets one chance to ask a user for permission. If your app only needs WhenInUse permission, but a third-party library is still rocking some iOS 7 code and it asks before you do, your app will request Always permission and if the user says no, you’re hosed.

I’ve also encountered third-party libraries that rely on which description string you’ve defined to infer which permission it should ask for. The problem with this is if you define both strings, there’s no way to know which string the library will key off of. In this case, you would only want to define the string of the permission type you intend to use. This should be fine, but if your app, or one of its libraries, ever asks for the permission that you haven’t defined a string for, we’re back to iOS never prompting the user. If you’re seeing your app fail to request permission, in all likelihood, you’re attempting to request a Location Services permission that you don’t have a description string for.

One last note: it appears if you compile with Xcode 5, you can still get away with not defining description strings, but obviously you don’t want to lean on that. I only mention it here because it’s still possible to ship an app for iOS 8 that will work fine without usage description strings, but this will likely come back to bite you later. Even if your code works now, make sure you’re doing things right so you and your users aren’t surprised later when your stuff breaks.

Finally, if you have trouble with apps from other developers not asking for Location Services when they need it because they’ve encountered one of the problems above, you can go to Settings > Privacy > Location Services and give the app permission there. The app will show up in the list, and when you tap on it you’ll see “Never” and either “Always” or “While Using the App” as your two choices. Enabling Location Services here will give the app the same permission as if it had correctly prompted you in the first place.

For more information, or clarification on anything I got wrong, see Apple’s CLLocationManager documentation.

Categories
Uncategorized

Software development, QA, and the reality of bugs

There was a lot of chatter this week after Apple pushed out iOS 8.0.1 with bugs that left some iPhone 6 and 6 Plus users without cellular service or Touch ID. If Apple has ever published an iOS update with such significant bugs, I can’t remember it. In the wake of the release, some publications thought the best thing to do would be to write defamatory articles pinning the failure to a single person: Apple’s QA manager who oversees iOS testing. As a QA lead and somebody who has worked in software for a number of years, this was cringeworthy to read. It’s not only a shitty thing for a news site to do, but also demonstrates that they lack any sort of understanding of software development. In response, I decided to write “Why bad bugs hit good people”. Head over to iMore for my full not-quite-rant.

Categories
iOS Mac Privacy Security

Security & Privacy Changes in iOS 8 and OS X Yosemite

I’ve been sifting through this year’s WWDC videos looking for all of the interesting bits around security & privacy. I’m not anywhere close to being done. Fortunately Luis Abreu has done the hard work for all of us and compiled his findings into a very handy post. The post has a lot of great info for developers, QA, and designers around what’s new and what’s changing. Of course you’ll still want to go do your own research before implementing any changes, but Luis’ post serves as a great quick-start guide.

Link: lmjabreu.com
Source: iOS Dev Weekly

Categories
iOS Tools

What Developers Should Know About Apple’s TestFlight

When Apple acquired Burstly, makers of TestFlight, earlier this year, many were hopeful that Apple was finally ready to provide developers with an easy way to manage beta testing. So naturally, developers responded to Apple’s official announcement of the (re)launch of TestFlight at WWDC with great applause. Since then, many (including Apple) have rejoiced that the days of dealing with UDIDs and provisioning profiles are over. Many already believe that TestFlight spells the end for HockeyApp. But looking at what we know so far about TestFlight, I’m not so sure that’s the case.

The Promise

TestFlight will bring two big changes to ad hoc app distribution as we know it. First, test devices are now managed using email addresses, rather than UDIDs. Second, the test device limit was drastically increased from 100 devices per account to 1,000 users per app. Many developers have been frustrated for some time now with Apple’s 100 device limit, and this has only gotten worse over the years with more new devices being released. The current system of UDIDs and provisioning profiles unnecessarily wastes a lot of developer time, requiring close monitoring and management of test devices and troubleshooting esoteric error messages.

With TestFlight, developers won’t need to ask testers for UDIDs anymore—they will simply send them an email invite from iTunes Connect. Once a user accepts the invite and installs the TestFlight app, they’ll be able to view details for apps, install betas, and provide feedback to developers. Developers will be able to use iTunes connect to upload builds, manage users, and even get insights into how testers are using the app. So far, so good, but here come the caveats.

Internal Testers vs. Beta Testers

TestFlight users will fall into two buckets: internal testers and beta testers. Beta testers will be the ones invited via email and, as previously mentioned, you will be able to have up to 1,000 of them per app. Internal testers will be managed in iTunes Connect by creating an account for each tester; you are limited to 25 of these. Builds for beta testers will need to be reviewed and approved by Apple before testers will have access to them, while internal testers will have access to builds as soon as they are uploaded. As others have already pointed out, reviews will only be required for the initial submission and any builds that contain major changes to the app—minor changes won’t require another review. But this is already a hurdle that developers didn’t previously have to deal with. And for many companies, 25 internal tester slots simply won’t be enough. It’s great to see Apple get rid of the 100-device limit, and for a lot of developers it may be sufficient, but for many the hassle of dealing with the 100-device limit isn’t going away, it’s just being replaced with a similarly frustrating limitation of 25 internal testers.

Supported Platforms

Not surprisingly, TestFlight is only available for iOS 8. While TestFlight originally worked on Android, that support was dropped shortly after Apple acquired Burstly and there’s no indication it will return. There also hasn’t been any mention of TestFlight supporting Mac apps (which Hockey does). So if you’re planning on making an iOS 8-only app, then you’re in good shape. But anybody supporting older iOS versions, Android, or wanting to have a Mac app will need to look elsewhere.

Build History

The demonstration shown in Apple’s iTunes Connect session seems to suggest that testers will only be able to install the latest version of a beta. When a new build is uploaded, the previous build is marked as Inactive. Most of the time this is perfectly fine, but it’s not uncommon for developers and testers to need to install previous builds of an app. You may need to go back and reproduce a bug in an old build, or go back to compare a design element that has changed, or check old builds to determine when a regression was introduced, or to test database migrations from old builds… there are plenty of perfectly valid reasons for needing the ability to install previous builds. Perhaps I’m reading into Apple’s demonstration too much, but if this winds up being the case, Hockey will be able to add this to the list of features it has over TestFlight.

Automated Builds & Continuous Integration

TestFlight builds will be uploaded and managed through iTunes Connect. Unless Apple provides command line tools for this (which there has been no hint of), any developers who use any sort of continuous integration environment for automating builds and uploads will be out of luck. Each update for testers will require a developer to manually build and upload through iTunes Connect. Obviously there are plenty of developers who currently do manual builds, and for them this won’t be a big deal. But for the many of us using CI to upload multiples builds a day, this lack of functionality alone is enough to immediately rule out moving from Hockey to TestFlight.

Crash Reporting

Another big feature that TestFlight will have is crash reporting. Apple has provided crash reporting for App Store apps for a while now, but many have found it to be lacking and utilize 3rd-party solutions instead. Apple has only mentioned TestFlight supporting crash reporting for App Store submissions, not betas. It’s better than no crash reporting at all, but it’s not a complete solution and it’s still subpar to the many 3rd-party solutions currently out there. Oh, and one more thing. Apple said that crash reporting and symbolication will be available later next year.

Support

Last but not least, let’s talk about support. Hockey won me over early on with their beyond-stellar support. I frequently receive responses to my support requests in less than 15 minutes, and at all hours of the day and night. One time I submitted a support request to find out if I could aggregate crash information in a particular way through the Hockey website, but was told it wasn’t currently possible. The next morning Hockey support sent me a Ruby script to accomplish what I wanted using their API. Apple won’t be, and likely has no interest in, providing that kind of support.

Where TestFlight Fits In

Believe it or not, I’m not trying to talk anybody out of using TestFlight. I’m quite glad to see TestFlight; I think it’s a big step in the right direction. TestFlight will be entirely sufficient for many developers’ testing needs, and the fact that those developers will be able to utilize TestFlight instead of relying on, and having to pay for a 3rd-party service, is great news. Even developers who continue to use services like Hockey to fulfill needs unmet by TestFlight will likely benefit from TestFlight. Hockey may make the most sense during development when you’re cranking out builds and rapidly iterating, but as you’re getting ready to ship to the App Store, being able to get your app into the hands of a much larger group before finally shipping to the App Store is a huge plus. The more users you have testing your app on more devices, the greater your ability to catch strange edge cases and eventually ship a more polished app. That’s not only great news for developers, it’s great news for users who easily become collateral damage of insufficient testing.

Maybe down the road Apple will expand TestFlight to compete more aggressively with Hockey. Maybe they’ll even kill off manual management of distribution profiles for good. But looking at what we know about these upcoming changes so far, TestFlight and HockeyApp are two different services that serve two very different needs. TestFlight isn’t going to kill Hockey, it’s going to complement it.