Categories
iOS Mac Privacy Security

Working with Apple’s App Transport Security

Update 6/23/15: Apple now has official documentation for App Transport Security.

With iOS 9 and OS X El Capitan, Apple has introduced App Transport Security. In a nutshell, App Transport Security enforces best practices for secure network connections — notably, TLS 1.2 and forward secrecy. In the future, Apple will also update these best practices to ensure they always reflect the latest security practices that will keep network data secure.

App Transport Security is enabled by default when using NSURLSession, NSURLConnection, or CFURL in iOS 9 or OS X El Capitan. Unfortunately for many developers this may mean that things break as soon as they build for iOS 9 or OS X 10.10. Fortunately Apple offers some configuration options to leverage App Transport Security where possible, while disabling it in places where you cannot support it.

You can opt-out of ATS for certain URLs in your Info.plist by using NSExceptionDomains. Within the NSExceptionDomains dictionary you can explicitly define URLs that you need exceptions for with ATS. The exceptions you can use are: NSIncludesSubdomains
NSExceptionAllowsInsecureHTTPLoads
NSExceptionRequiresForwardSecrecy
NSExceptionMinimumTLSVersion
NSThirdPartyExceptionAllowsInsecureHTTPLoads
NSThirdPartyExceptionMinimumTLSVersion
NSThirdPartyExceptionRequiresForwardSecrecy
Each of these keys allows you to granularly disable ATS or particular ATS options on domains where you are unable to support them.

Sample ATS plist

In the first beta of iOS 9, these keys are incorrect and instead you’ll need to use the following: NSTemporaryExceptionAllowsInsecureHTTPLoads
NSTemporaryExceptionRequiresForwardSecrecy
NSTemporaryExceptionMinimumTLSVersion
NSTemporaryThirdPartyExceptionAllowsInsecureHTTPLoads
NSTemporaryThirdPartyExceptionMinimumTLSVersion
NSTemporaryThirdPartyExceptionRequiresForwardSecrecy

These keys will undoubtedly be fixed in a future seed. If you can, you should use the first set of keys above that Apple is officially supporting, though if you’re using the temporary keys, they should continue to work in future betas. Thanks to Juan Leon for bringing this to my attention—I was told the same in the labs.

Below are examples of different scenarios developers may encounter.

Example A: ATS for all

This is the easiest one. The only thing you need to do is use NSURLSession, NSURLConnection, or CFURL. If you’re targeting iOS 9 or OS X El Capitan or later, ATS’s best practices will apply to all of your NSURLSession, NSURLConnection, and CFURL traffic.

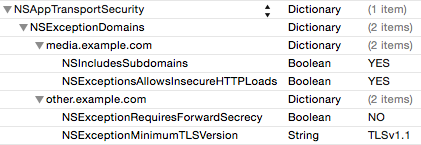
Example B: ATS for all, with some exceptions

If you expect all of your domains to work with ATS, except a few that you know will not work, you can specify exceptions for where ATS should not be use, while leaving all other traffic opted in. For this scenario, you’ll want to use an NSExceptionDomains to specify the domains for which you wish to override ATS’s default settings. To opt-out an entire domain or sub-domain, create a dictionary for the URL you want to opt-out of ATS, then set NSExceptionAllowsInsecureHTTPLoadsto true. You can also specify more specific rules you wish to override with NSExceptionRequiresForwardSecrecy and NSExceptionMinimumTLSVersion if you don’t want to completely disable ATS on those domains.

ATS for All

Example C: ATS disabled, with some exceptions

Conversely, you may only want ATS to work on domains you specifically know can support it. For example, if you develop a Twitter client, there will be countless URLs you may want to load that may not be able to support ATS, though you would want things like login calls, and other requests to Twitter to use ATS. In this case you can disable ATS as your default, then specify URL which you do wish to use ATS.

In this case you should set NSAllowsArbitraryLoads to true, then define the URLs that you want to be secure in your NSExceptionDomains dictionary. Each domain you wish to be secure should have its own dictionary, and the NSExceptionAllowsInsecureHTTPLoads for that dictionary should be set to false.

ATS Disabled with Exceptions

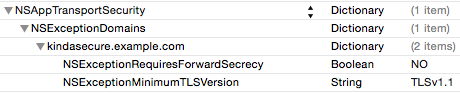
Example D: Downgraded ATS

In some cases you may want ATS on all, or some, or your URLs, but are not ready to fully support all of ATS’s best practices. Perhaps your servers support TLS1.2, but don’t yet support forward secrecy. Rather than completely disabling ATS on the affected domains, you can leave ATS enabled, but disable forward secrecy. In this scenario you would create an NSExceptionDomains dictionary, a dictionary entry for each domain you need to override settings for, then set the NSExceptionRequiresForwardSecrecy value to false. Similarly, if you wish to have forward secrecy enabled, but need the minimum TLS version to be lower, you can define your supported TLS version with the NSExceptionMinimumTLSVersion key.

Downgraded ATS

Example E: NSA-friendly Mode

If you want to opt-out of ATS entirely (which you really shouldn’t do unless you fully understand the implications), you can simply set NSAllowsArbitraryLoads to true in your Info.plist.

NSA-friendly Mode

Third-party keys

You may have noticed a few keys that appear to be duplicates of others keys with the addition of “ThirdParty” in the name. NSThirdPartyExceptionAllowsInsecureHTTPLoads
NSThirdPartyExceptionMinimumTLSVersion
NSThirdPartyExceptionRequiresForwardSecrecy
Functionally these keys will have the same result as the keys that don’t have “ThirdParty” in them. The actual code being invoked behind the scenes will be identical regardless of whether you use the ThirdParty keys or not. You should probably use whichever key best fits your exceptions, but no need to overthink it.

Certificate Transparency

While most security features for ATS are enabled by default, certificate transparency is one you must opt-in to. If you have certificates which support certificate transparency, you can enable certificate transparency checks with the NSRequiresCertificateTransparency key. Again, if your certificates don’t yet support certificate transparency, by default this check will be disabled.

If you need help debugging issues that arise from having App Transport Security enabled, setting CFNETWORK_DIAGNOSTICS to 1 will log all NSURLSession errors including the URL that was called and the ATS error that resulted. Be sure to file radars for any issues you encounter so that ATS can be improved and flexibility expanded.

All of the above information was provided in Apple’s Networking with NSURLSession session at WWDC 2015. Finally, Apple emphasized in the talk to report any issues that you run into and keep any eye out for any changes that may be coming in future betas.

Categories
Mac Tools

Simple Script for Getting a Device’s UDID

When I need to grab a device’s UDID, it has always felt heavy to me to have to launch iTunes or Xcode just to get a simple 40-character string. After years of sighing about it, I finally did something. Below is a simple bash script that uses mac OSes system_profiler command to grab the UDIDs of any iOS devices connected to your computer. It will print all UDIDs to your terminal’s stdout and copy the last UDID to your clipboard for easy pasting.

Updated 9/24/18 to detect new 24 character UDIDs and insert a hyphen where Apple expects one.

Categories
iOS Mac Privacy Security

Security & Privacy Changes in iOS 8 and OS X Yosemite

I’ve been sifting through this year’s WWDC videos looking for all of the interesting bits around security & privacy. I’m not anywhere close to being done. Fortunately Luis Abreu has done the hard work for all of us and compiled his findings into a very handy post. The post has a lot of great info for developers, QA, and designers around what’s new and what’s changing. Of course you’ll still want to go do your own research before implementing any changes, but Luis’ post serves as a great quick-start guide.

Link: lmjabreu.com
Source: iOS Dev Weekly

Categories
Mac OS X Server Uncategorized

Mac Mini Servers: A Cautionary Tale

This post will deviate from the type of content I generally post here. It isn’t really related to QA and instead deals with a recent problem we encountered when upgrading our build servers. I’m posting about it here in hopes that others may save themselves time and trouble from the lesson that we learned. If you’re interested, read on, if not, hopefully I get some more QA posts up over the holidays. If you just want to know what the problem was and how we fixed it, you can scroll right to the bottom.

We recently decided to give our build servers an upgrade. Our existing setup was a Mac mini running Jenkins and 4 Xserves that served as slaves. While the Xserves were great as servers, their product line has been discontinued, they’re noisey, they’re large, and they require more power than Mac minis. And even though redundant networking and power supplies are nice, they’re overkill for our needs. So when we went to update the servers we decided go to with Mac mini servers.

Setting up the first slave took a little bit of time and patience. We decided to start clean and set these up from scratch rather than migrate the existing servers. We had a general idea of what was needed and figured out what pieces we were missing through trial-and-error. Taking notes on steps as we went through the first one allowed for an expedited process on the subsequent servers. When we finally got the first one setup we launched it as a slave on Jenkins, assigned a project to build on it, kicked it off and, with some tweaking, got the build to succeed.

With my set of steps to follow, I quickly ran through the second server and had it up and going in an hour or so. Feeling fairly confident in the process at this point, I decided to try a third server near the end of the day, but this one was a special case. This one was going to replace the server that also ran our VPN. Initially to try and avoid having to re-create all the VPN users and have everybody set up a new password, I set up this Mac mini as a clone of the existing server it would be replacing.  During the cloning process though I began to give things more thought. After talking with my boss we decided that VPN would actually be moved off of the build servers to a more dedicated box. Once the cloning finished, I booted the mini into the recovery menu and did a re-install.

An hour or so later the re-install was complete, but it hadn’t gone quite as I had hoped.  There still seemed to be certain user data and settings that had persisted through the re-install, but it was good enough for now. I ran through my list of steps, skipping a few for software that had persisted through the re-install, and got the server added to Jenkins. Feeling satisfied with my work for the day, I decided to hold off until the next day to do the remaining servers.

The next morning we noticed something strange; Jenkins was showing that two of the new servers had response times of a few seconds while the old servers were showing response times of a few milliseconds. Jenkins was also reporting a clock difference on the two new servers of being a few seconds ahead while the old ones all showed in sync. We also noticed a few builds had failed overnight, but all at different points in the build process. Some of them were even failing in the middle of uploading builds to an external server.

Our first guess was a networking problem, but why? When we created the new build servers we gave them the same names as their predecessors that were to be retired. We also assigned them the same IP addresses, but due to some technical hurdles, the static IPs weren’t being handled by the router. Instead we were telling the machines to use DHCP, but were manually assigning them the IPs we wanted them to have. We wondered if these factors had caused some weird networking problems when trying to reach these new machines that had taken over old hostnames and IPs. While trying to diagnose the issue I  noticed that if I pinged one of the new servers continuously, intermittently several packets would timeout.

Oddly, the third server wasn’t exhibiting any of the symptoms that the other two servers were. I had more or less followed the same steps, but one notable difference is this server had gotten a new hostname and IP since the existing Xserve needed to stay up for now to run our VPN. We were already thinking it seemed like some kind of network issue, and now we had one server that didn’t take over an existing IP and hostname and it wasn’t having any of the same problems.

Now that we had figured out the issue, it was just a matter of moving the other two servers we had already setup to new hostnames and IPs. The change only took a couple minutes and we were back in business. Jenkins was showing the response times as low and the clocks in sync. Everything looked great… until a little while later when I got an email notifying me that a build had failed. I looked and sure enough, it was one of our new Mac minis and like the other failures, it happened in the middle of the build. Looking at the Jenkins interface, the slave had now been marked as down as its response times had gotten so bad. I looked to the third server that had shown the initial success and it was still fine. Once again, I was perplexed.

I tried searching online for any clues on what to do about a drifting clock in Jenkins with no luck. I went to an OS X Server room on IRC and asked for help, but was directed to try the Jenkins room. I went to the Jenkins room for help and nobody had any suggestions. I spent the night mulling things over and was running out of ideas.

The next morning I talked with Casey, one of our developers who had been helping me try to troubleshoot the issue the last couple of days. Casey had an idea; what about the energy saving preferences? I quickly took a look at the two problematic servers and noticed they were set to put the computer to sleep after 30 minutes of inactivity. I checked the third server and this option was disabled. I quickly disabled the option on the other two servers and wished for the best. Initially things looked better, but I had already been fooled several times with other solutions that initially had good results.

We let the servers go for a few hours and this time the good results actually stuck. That was it; Casey figured it out. In retrospect it all makes sense. Well… almost all of it. The build processes didn’t count as activity because they were running in the background; the OS was relying on mouse/keyboard input to tell it the computer was in use. The reason the third server didn’t have any issues is because one of the settings that persisted across the reinstallation was the Xserve’s Energy Saver preferences. The Xserve’s seemed to have shipped with a much saner default of “Never” for the computer sleep option. I still don’t quite understand the symptoms of showing the clock as drifting ahead or why the response time appeared slow rather than just non-existant. Regardless, this was a much harder lesson to learn than it probably should have been. It should have occurred to us much sooner to check the Energy Saver preferences, but I do hope that Apple will change the default on the Mac mini servers to have these preferences disabled and save others the trouble and confusion. I don’t imagine that many people out there running servers want them going to sleep every 30 minutes.

tl;dr: Mac mini servers running as build servers had symptoms of slow response times with Jenkins, Jenkins reporting their system clocks as ahead, and builds failing at random points, but not all the time. This was fixed by changing the Mac mini server Energy Saver preferences from the default of putting it to sleep after 30 minutes of inactivity, to never putting it to sleep.