Categories
iOS Networking Tools

Trusting Custom Root Certificates on iOS 10.3

TL;DR: Navigate to Settings > General > About > Certificate Trust Settings and turn the switch on for your custom certificate.

Like many, Charles Proxy has become an indispensable part of my daily toolkit. Every person on my QA team uses it daily for their projects. Recently while testing on iOS 10.3, one of my team members couldn’t get his SSL traffic to proxy. Usually when somebody runs into this, it’s because the person hasn’t installed the Charles Proxy root certificate on the device they’re trying to proxy. Then why you try to proxy SSL traffic in Charles you’ll the following error: SSLHandshake: Received fatal alert: unknown_ca

Charles Proxy will even offer a helpful suggestion:

You may need to configure your browser or application to trust the Charles Root Certificate. See SSL Proxying in the Help menu.

iOS is refusing the SSL handshake because the certificate authority that has issued the SSL certificate being used is not in its Trust Store. Previously to resolve this, we would just need to go to http://ssl.charles in Safari on the device, and we could then install the root CA from Charles and tell the device we want to trust it. In this case, the QA person had already taken these steps. After some digging around, he found the problem. Settings > General > About > Certificate Trust Testings

The Charles Proxy Custom Root Certificate that he had installed showed up in the list, but its toggle was turned off. While this section existed prior to iOS 10.3, by default when you would install a custom certificate, iOS would implicitly trust it. No further action required. As of iOS 10.3, the default for new custom certificates is to not trust them. If you want to trust the custom certificate you’ve installed (why else would you have installed it?), you’ll need to navigate to the section mentioned above and manually turn the switch on to trust the certificate. Any certificates installed and trusted prior to iOS 10.3 seem to be grandfathered in, so you won’t run into this until you’re trying to use a new root certificate.

Categories
iOS Networking Privacy Security

Network Security Changes Coming to iOS

Changes to App Transport Security

Last year, with iOS 9, Apple introduced App Transport Security; an enforcement of best practices for encrypted networking. By default, App Transport security requires the following:

  • NSURLSession and NSURLConnection traffic be encrypted
  • AES-128 or better and SHA-2 used for certificates
  • TLS v1.2 or higher
  • Perfect forward secrecy
In other words, it requires that your app keep your users’ network traffic reasonably protected.

While enabled by default in iOS 9, Apple recognized that may developers don’t control their backends, and included the ability to set exceptions for App Transport Security. The problem is many developers went right for the NSAllowsArbitraryLoads key, which disables ATS entirely, then never bothered to re-visit their configuration to get everything working nice and securely.

Last week, at WWDC 2016, Apple announced that beginning January 1, 2017, App Transport Security will be required (this topic starts about 1m20s into the What’s New In Security session). You should really watch the talk for the exact details from Apple, but in short, all of your app’s traffic needs to be secured with HTTPS and will need to use TLS v1.2 or higher.

Apple will still allow some exceptions, but the rules will be much less relaxed than they have been:

  • Most exceptions will now need to be justified to Apple. NSAllowsArbitraryLoads, NSExceptionAllowsInsecureHTTPLoads, and NSExceptionMinimumTLSVersion will all require a reasonable justification for use.
  • NSExceptionRequiresForwardSecrecy will not require a justification for now. If used, this exception will be granted automatic approval. Presumably this will change down the road as forward secrecy becomes more widely spread.
  • Streaming media using AVFoundation is exempt, but Apple says you should still encrypt with TLS if possible.
  • Content loaded inside of WKWebView does not have to be encrypted. This requires specifying the NSAllowsArbitraryLoadsInWebContent key as true in your Info.plist.
  • Data that is already encrypted does not have to go over HTTPS.
The specific example Apple uses in the talk for still needing exceptions is communicating with a third-party server where you can’t control their cipher suites. Even if this is your situation, it sounds like needing to justify exceptions may slow review time, so it’s probably worth talking to any third parties you work with to ensure they can meet ATS requirements.

If the reason you haven’t supported ATS yet is because it seemed like too much work, now’s the time to start making changes. One of the difficulties you may face implementing ATS is diagnosing failures. On the surface, you’ll likely just see data fail to load in your app with no real indication as to why. What I’ve found most useful is the nscurl --ats-diagnostics https://example.com command. It will test different ATS configurations against the specified domain and report back showing which scenarios pass and which fail. The failed scenarios will make it much more clear what you need to change on your server to support ATS. Tim Ekl has some more helpful info about debugging in this blog post on ATS from last year.

If the reason you don’t yet support ATS is the cost or difficulty of getting set up with SSL certificates, be sure to check out the Let’s Encrypt project. Let’s Encrypt is a free, automated Certificate Authority that operates with support from a large number of sponsors such as Mozilla, the EFF, Chrome, and Cisco.

Certificate Transparency

Certificate Transparency is a standard for monitoring and auditing certificates (TLS certificates in this case). Its purpose is to help protect against fraudulently issued certificates. Last year when Apple went over App Transport Security, they also briefly covered the ability to require certificate transparency in apps using the NSRequiresCertificateTransparency key, though they said this functionality was off by default.

This year, certificate transparency is still not required, but Lucia Ballard spent several minutes discussing it in the same What’s New in Security session, announcing that Apple is “joining the effort for certificate transparency”. She also took some time to cover OCSP stapling—a method for checking to see if a certificate has been revoked—and presents it as a recommended practice. I think the verbiage used around Certificate Transparency and OCSP stapling is noteworthy. I’ll include the text of two quotes from the session here for your consideration:

We think now is the time for folks to move to it and start adopting [OCSP stapling].

And later:

It would be a great time to start experimenting with certificate transparency, find certificate authorities that are participating, and get integrated into this ecosystem. And please go enable OCSP stapling.

I strongly encourage everybody to go watch, at a minimum, the certificate transparency portion of the What’s New in Security session from WWDC 2016. It’s less than 10 minutes long, starting at 7m55s and ending at 16m00s (though really you should watch the entire session). The speaker gives a great overview of both Certificate Transparency and OCSP stapling. They also recommend certificate-transparency.org as a developer resource on the subject.

Updating your apps

Your first priority should be to get your app ATS compliant before the January 1st deadline. Really you should start now because many developers are going to encounter obstacles in doing so. Don’t procrastinate.

Once you have ATS working, it seems like it will be worth your time to start getting familiar with certificate transparency and OCSP stapling. Not only will this benefit the security of your users, but it may make your life easier down the road should Apple choose to encourage its adoption more strongly.

Categories
iOS Networking Security

iPhone Apps Accepting Self-Signed SSL Certificates

I recently spent some time looking at a number of iPhone apps in the App Store to see how well they were implementing SSL. It was a little surprising to see how many big-name apps ignored SSL errors and even more surprising to see some that didn’t use SSL at all. If you want the short version, head on over to iMore.com. Here I wanted to take some time to take a closer look at the issues that I found and how I found them in hopes that other developers can avoid making the same mistakes.

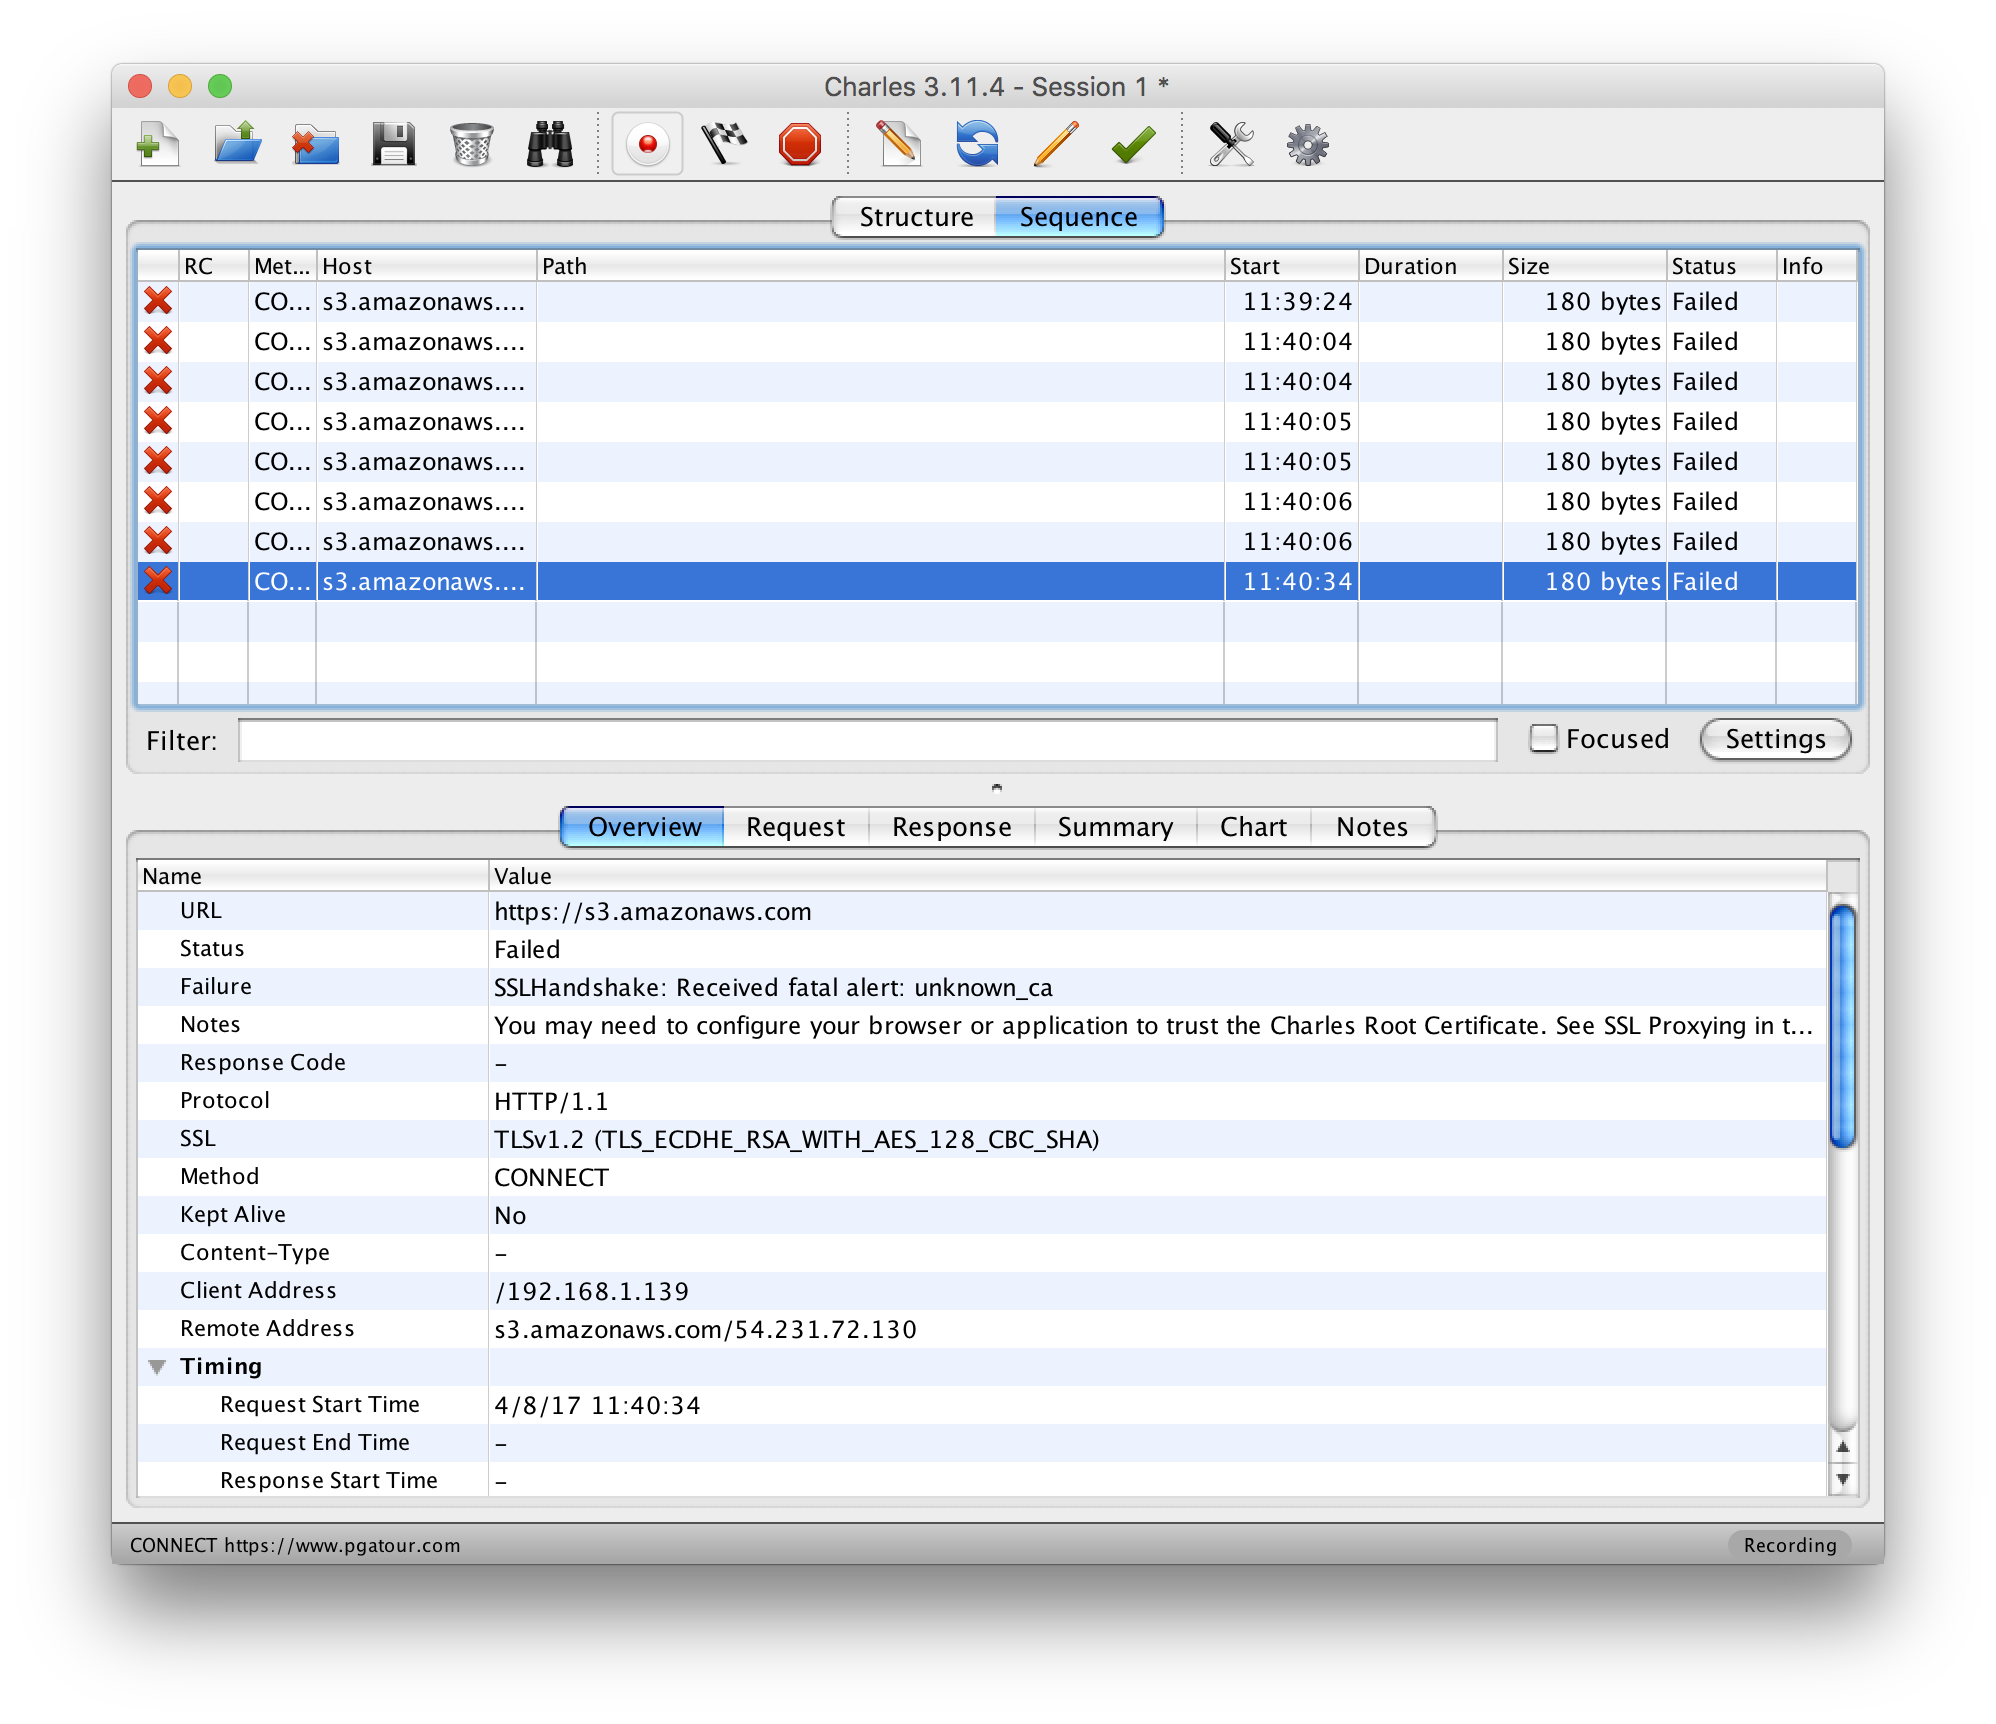
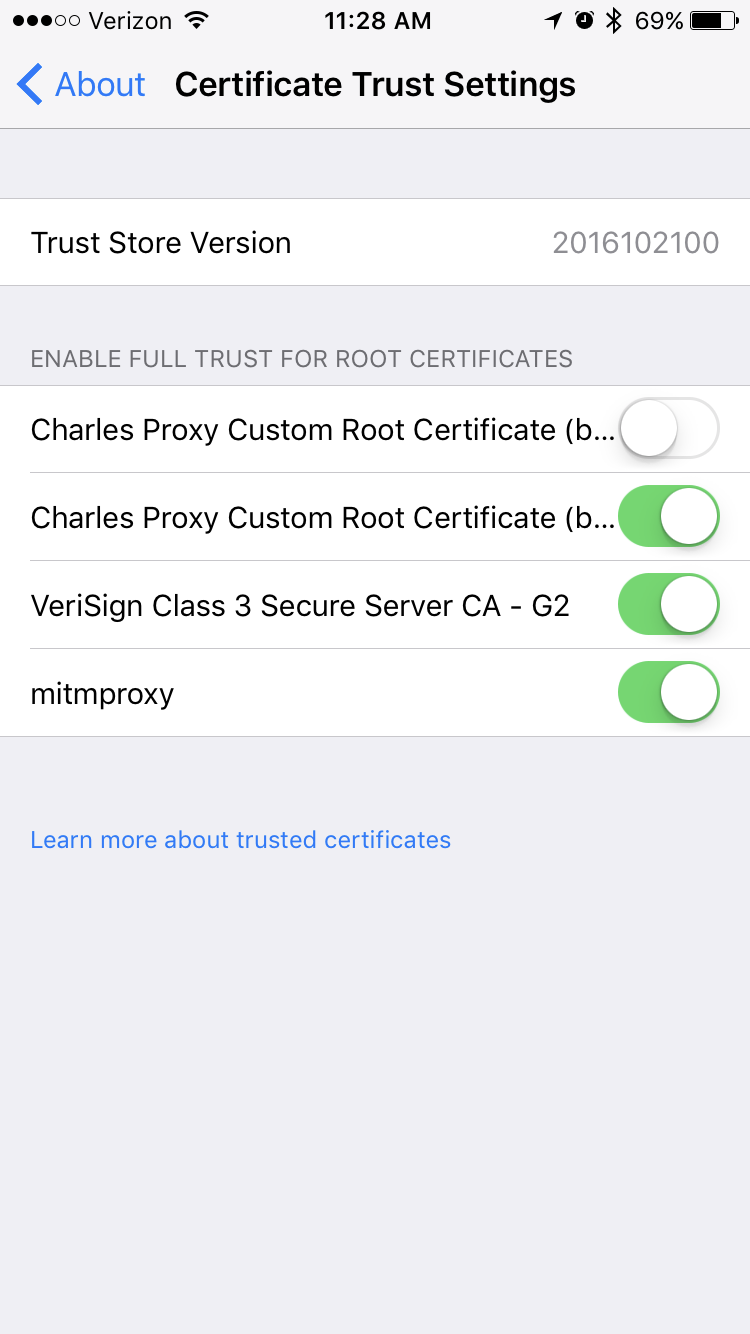
Charles Proxy is a tool I’ve discussed on here previously. It’s a proxy tool that allows you to intercept traffic from your device. One of the features Charles has is SSL proxying. iOS ships with a listed of trusted Certificate Authorities on every iPhone, iPad and iPod touch. These CAs are organizations, who are responsible for issuing SSL certificates, that Apple has deemed trustworthy. Modern browsers, as well as other software and hardware, ship with similar lists that tell them which SSL certificates can be trusted and which cannot. If an iPhone, for example, goes to make a secure connection to https://google.com, the device looks at the SSL certificate and, among other things, checks the CA that issued the certificate. In Google’s case, the device would see that the SSL certificate has been issued by Verisign, and since Verisign is a trusted CA, it will accept the SSL certificate for this communication.

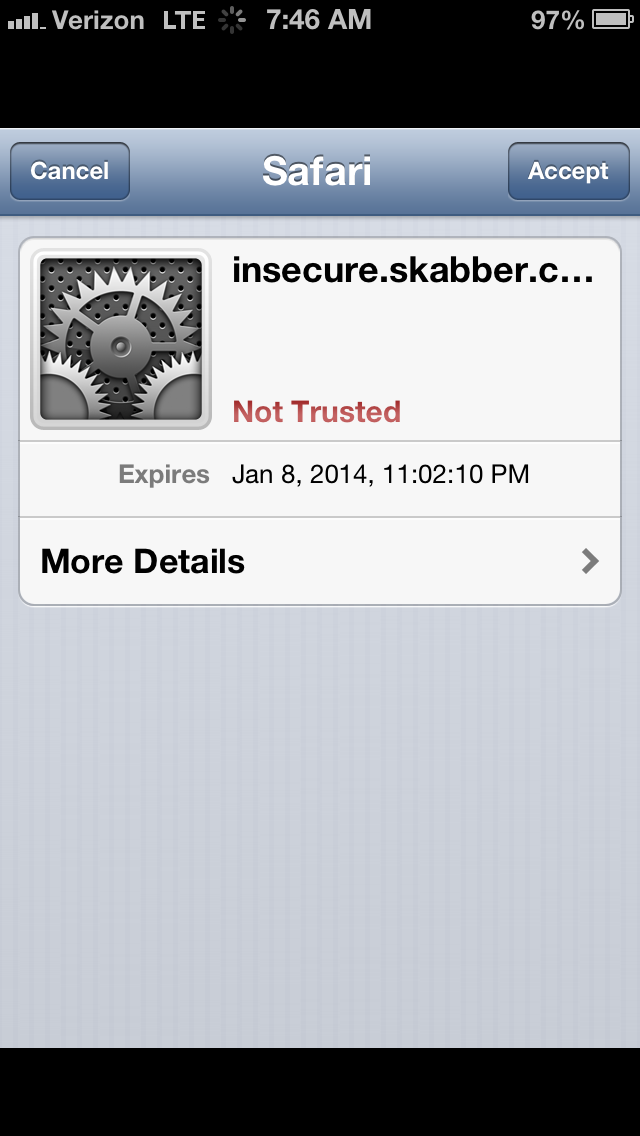
Conversely, if you were to try to connect to https://insecure.skabber.com in Safari on your Untrusted Certificate
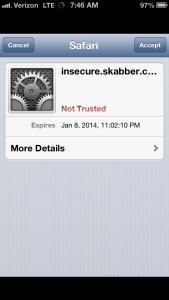
device, you would receive an alert about not being able to identify the server’s identity and asking if you want to continue anyway. This is because the certificate has been issued by the Ministry of Silly Walks, which is not a trusted CA. If an app attempts to make a connection and runs into an issue like this, that app should fail the connection. Since the identity of the server you’re connecting to cannot be trusted, the application should err on the side of caution and refuse to send any data, lest it turn over sensitive details to a malicious entity. To understand why the warnings should be heeded or what might cause them to appear, it may be helpful to give more background here.

The reason encryption works is because a person trying to eavesdrop doesn’t have the keys to decrypt the data. But what if they did? In a man-in-the-middle attack, a malicious third party sits between you and the server, decrypting your traffic. The attacker pretends to be the server to you, and pretends to be you to the server. When you send your encrypted data to what you believe is the server, it’s actually the attacker who now has the keys to decrypt the data, because you’re the one they began the connection with. After decrypting the data, looking at it, and manipulating it if they want, the attacker then re-encrypts the data and sends it across their secured connection to the actual server. When the server responds, the attacker will be able to do the same, decrypting the data, looking at it, then re-encrypting it before sending it along to you. But in order to do this, the attacker would need to possess an SSL certificate for the server you’re trying to connect to.

As it turns out, anybody can create their own certificate authority. As such, anybody can issue an SSL certificate. Furthermore, that SSL certificate can be for any server that they want. You could go generate an SSL certificate for google.com right now if you wanted. But what would prevent you from ever being able to make use of that certificate, like in the scenario described above, is that it would not be issued by a trusted CA. You could say you were google.com, but nobody would believe you because your certificate didn’t come from a trusted source. SSL hinges on this chain of trust. And this is where some apps fail.

Instead of only accepting SSL certificates from iOS’ trusted list of CAs, some apps accept SSL certificates issued by anybody. Because of this, the man-in-the-middle attack described above is possible against traffic sent by these apps. An attacker can use an SSL proxying tool that will generate SSL certificates on-the-fly for whatever server is trying to be connected to. Since the apps trust any CA, they will allow these certificates and open up communication with the attacker, who can then view the traffic and send it on to the server. Credit Karma, Fandango, Cinemagram, Flickr, eFax, WebEx, TD Ameritrade, E*TRADE, Monster, H&R Block, ooVoo, Match.com, PAYware (by Verifone), EVERPay Mobile POS, and Learn Vest all suffer from this issue. Some companies have already responded. E*TRADE already has a partial fix available, and a more complete fix on the way. Credit Karma, TD Ameritrade say they have updates in the works. Cisco has opened tickets in their bug tracker (Cisco.com login required) and CVE for users to track the issue, and are also working on a fix. Monster responded but has not been able to say whether or not they will fix it. eFax’s stance is that once your data is outside of their network, they cannot protect it. None of the others have responded. Users should be particularly careful with buying tickets through Fandango since credit card details are transmitted.

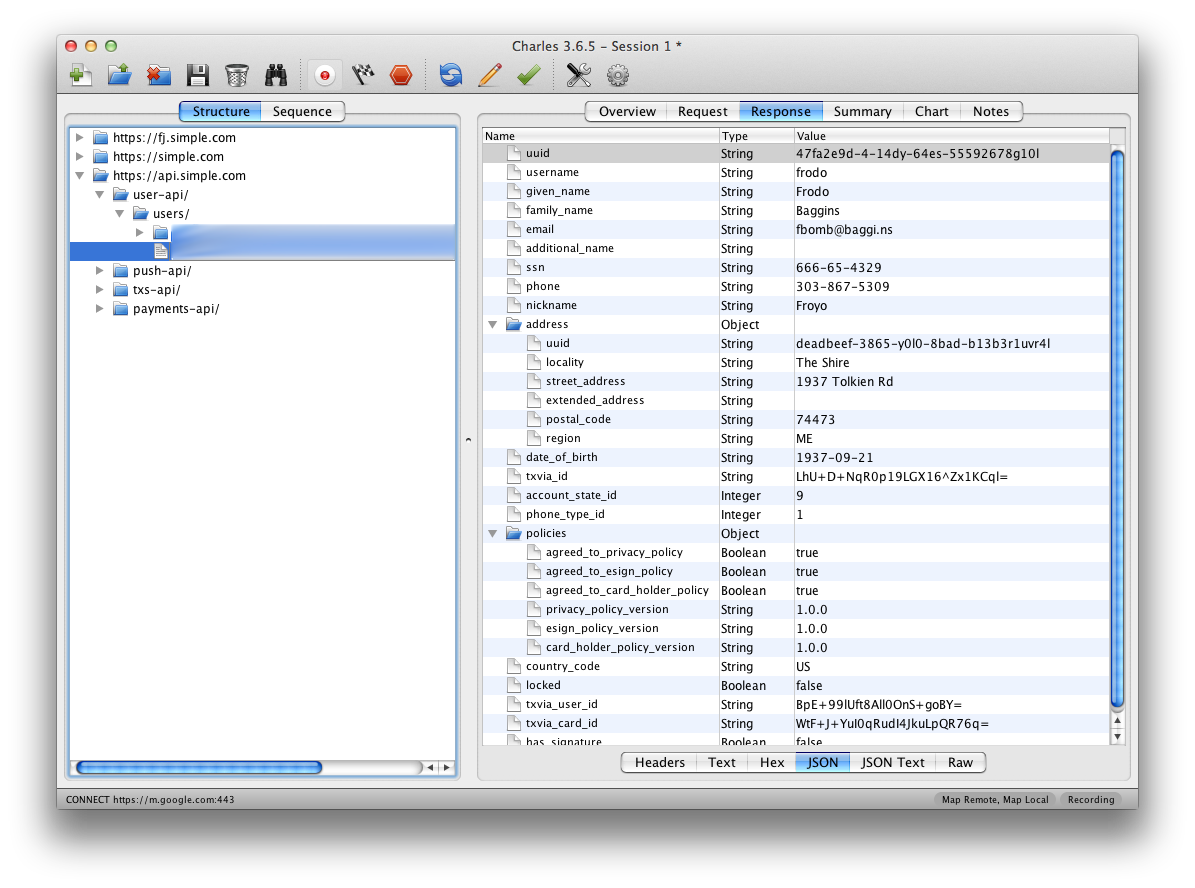
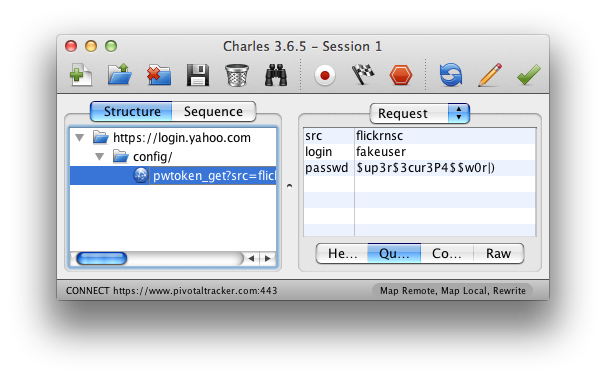
These apps are easy enough to find on your own by using a tool like Charles Proxy or mitmproxy. Normally for these tools to work for testing, you would install a certificate on your device to tell the device to trust your CA. Simply skip that step (or uninstall the certificate if you already have it Settings > General > Profiles) and fire up your proxy with SSL proxying enabled. With traffic going through your untrusted proxy, you can fire up apps like Facebook and see that they won’t work. Looking at the requests in your proxy, you’ll see that a connection was attempted, but then closed and no traffic was sent. Now, if you go and open an app that ignores warnings about untrusted CAs, like Flickr, and try to log in, you’ll see something different. You’ll see the app successfully log in and in Charles, you’ll see the request that was sent to the server, and inside it, your username and password. If an attacker were performing a man-in-the-middle attack on you, this is what they would be seeing. Flickr Login

While searching for apps with this problem, I stumbled upon a few that while not suffering from this, had other security problems related to logins. Flixster, iSlick, Camera Awesome!, TechCrunch and Photobucket all send some login information over HTTP. In the case of Camera Awesome!, it’s only Photobucket credentials, and in TechCrunch it’s only authentication for Pocket. But iSlick, Flixster and Photobucket all send usernames and passwords for their respective accounts in plaintext. This means that a user wouldn’t have to do any SSL certificate generation or proxying, they need only be on the same network as you and sniff the network traffic. Obviously this poses an even larger security risk than just accepting self-signed SSL certificate. Particularly if users use the same usernames and/or passwords for other accounts. In Photobucket’s case, they hash your password with MD5, but the password can easily be retrieved using a reverse MD5 hash lookup tool.

So what should be done? Well in the case of apps not using encryption, they should be using SSL for those login requests. iSlick says that SSL support will be coming in a future update. I haven’t heard any updates from the others. As for the other apps that are using SSL, but not implementing it correctly, they need to make sure that they respond to SSL warnings properly. From what I’ve seen, most networking libraries refuse self-signed SSL certs by default. Perhaps ignoring these warnings was done for development purposes and developers forgot to later pull that code out. Whatever the case, I hope each of the companies will respond quickly with updates for their users and hopefully we can all learn from their mistakes to be a little more cautious about how we implement security in our apps. If you decide to do some research on some of the apps you use, be sure to let developers know if you find a problem so they can fix it.

Categories
iOS Networking Security

Simple Security

We previously looked at how to peek inside app bundles to get an inside look at how they might be handling data. Another important element to an app’s security is how they handle data externally. You can read through Terms of Service and Privacy Policy, but the only real way to know what data your applications are sending is to take a look at their traffic. I recently received an invitation to Simple; a service that seeks to replace your bank. Naturally, the first thing I did after signing up was start poking and prodding at their app. All too often these endeavors to get a glimpse at what apps are doing behind the scenes are surprising and eye-opening. Sadly, Simple was no exception.

Simple Logo


After looking at the app bundle with PhoneView and failing to find anything interesting there, I fired up Charles Proxy to have a look at the app’s traffic. The good news is Simple appears to be sending everything over SSL. This means that if, for instance, you’re at the airport and your iPhone is on an open wi-fi network, an attacker will just see encrypted garbage if they look at the traffic going between your iPhone and Simple’s servers. Now the bad news.

Charles Proxy has a wonderful option called SSL proxying. SSL proxying is handy for debugging when your app’s traffic is encrypted, but you want to see the contents. The first issue I noticed with Simple is it doesn’t take any steps to make sure it’s talking to its own servers. SSL guarantees that your connection is encrypted, but it doesn’t necessarily guarantee who is on the other end of that encrypted tunnel. Without the app validating that it’s talking to the server it should be talking to, it’s possible for an attacker to perform a man-in-the-middle attack.

Editor’s Note: In iOS (and any modern web browser), there is a list of trusted CAs that is bundled with the OS. These CAs are who issue SSL certificates. When an SSL connection is established, if the SSL certificate’s URL does not match the URL that a connection is being made to, a warning will be raised and the connection will fail. This means that a malicious attacker can’t use his SSL certificate that he may have acquired for fakebank.com to perform a MITM attack with requests that are going to https://simple.com. Some sort of compromise of the chain of trust in SSL would have to take place, like a CA being hacked and generating a phony certificate for Simple’s servers. When I originally said that Simple doesn’t take any steps to make sure it’s talking to its own servers, what I meant was it’s not performing any validation outside of what SSL inherently gives on iOS. There is an additional step that can be performed that is called SSL pinning. With SSL pinning, the app can take matters into its own hands to perform additional validation on who it’s talking to, rather than relying on the more general list of trusted CAs. This would ensure that in cases like a CA being hacked, there would be an additional layer of security by the app to validate it’s still actually talking to Simple’s servers. However, it’s worth emphasizing that without such a compromise taking place, user data is encrypted and secure with Simple’s app. All data is going over an SSL connection, and some compromise of SSL would need to occur for this data to be at risk in this scenario.

Normally the way SSL works is the client will setup an encrypted connection with the server before sending data to it. The way a man-in-the-middle attack works is the attacker intercepts your communications to the server and the server’s communication back to you. The client has an encrypted tunnel set up with what it believes to be the server. The server has an encrypted tunnel set up with what it believes to be the client. In reality both are just talking to the attacker and the attacker relays the traffic on after it’s able to take a look at it.

A MITM attack isn’t extremely likely on iOS because iOS ships with a list of trusted SSL certificate authorities. Using an app like Charles Proxy, you use a self-signed SSL certificate which iOS won’t trust unless you explicitly tell it to. That said, SSL is not foolproof and there have been instances in the past of it being exploited, and even of attackers creating phony SSL certificates signed by a legitimate and trusted CA.

Ultimately this isn’t something users have to worry about too much, but it is something Simple should fix. The app should be making sure it’s talking to Simple’s servers and Simple’s servers should make sure that it’s really the app that’s talking to them.

What’s more interesting is what you find once you start looking at Simple’s traffic. Since Simple isn’t doing any certificate pinning, we can enable SSL proxying in Charles and watch the traffic that Simple is sending and receiving. The first thing that jumps out is the request to https://api.simple.com/user-api/mobile-auth-tokens when you sign in to your account. Included in the request are your plaintext username and plaintext passphrase. The request is sent over SSL, but this doesn’t guarantee security and when dealing with such sensitive data, more security measures should be taken.

To be fair, up until this point, I haven’t seen anything that Simple is doing wrong that other banks are doing right. Of the two other banks I have accounts with, neither do pinning of SSL certificates or have any additional security to protect your username and password when signing in. So far Simple’s behavior seems par for the course. So far their security is just as disappointing as my other banks.

But wait, there’s more… There’s another request sent when you sign in: https://api.simple.com/user-api/users/UUID. The body of the request isn’t all that exciting, but the contents of the response are. It seems to include all of our personal info including full name, email, street address, date of birth, and social security number. Yes, your social security number. Simple’s server is sending all of this data back to your app when you log in, and as most of this info doesn’t seem to be used by the app anywhere, it’s unclear why they feel the need to send it.

After reading their security policy I felt hopeful that they’d be receptive to my concerns, so I sent an email to their security team. After eight days, I sent a followup to make sure my original email hadn’t been lost. Finally, a reply:

Hi Nick,

My apologies for not responding sooner; we did receive your report and I’ve discussed the issues you’ve raised with the team.

We are continuously working to improve the security of our solutions, and you can expect to see steady improvements as we continue to build out our platform. The challenges with ensuring the effectiveness of SSL are well-understood and under constant review inside the organization. In addition, it does look like we are transmitting more data than we absolutely need to and that is something that we are actively working to improve.

Thank you again for your message, and please do not hesitate to contact us again. We also provide a GPG key for communicating security issues with Simple on the Security page at www.simple.com; please feel free to use that in the future if you are able.

Justin Thomas Director of Information Security Simple

Simple’s 404 image – I can relate

So it sounds like maybe they’ll fix this at some point… or maybe not, I’m not sure. I’ve seen restaurants respond with more urgency when they screw up my hamburger. For a company that I’ve entrusted with my personal and financial data I expect them to treat security with the utmost importance. I expect them to fix security oversights as quickly and apologetically as possible. Since the company does not seem to share my enthusiasm there, I felt that the responsible thing to do was inform other users of these shortcomings so that they can make an educated decision on what to do with their own accounts. I’m still hopeful that eventually Simple will fix these issues, but in the meantime their users deserve to know how the company is handling their information.

Update #1 12/20/12 3:00PM - Simple has responded to several users on Twitter in order to try and address their concerns. Happy to see them actively responding to users and looking forward to seeing the issues actually fixed.


Update #2 12/21/12 9:00AM – I received a tweet from Brian Merritt, the Director of Engineering at Simple, asking if I’d be willing to give him a call and talk.

Good news. The SSN issue has been fixed as of last night. If you go look at your traffic now, your SSN is no longer being sent back by the server. Brian also reassured me that the SSL certificate pinning is an issue that they were aware of and have been working on. Unfortunately that sort of fix will require an app update, so it’s something we’ll have to wait on, but it does indeed sound like the fix is coming.

Categories
Networking Uncategorized

Charles Proxy: Like One of the Family

When it comes to testing slow network conditions, we already covered Network Link Conditioner. But what’s that you say? You’re wondering if there’s a more robust and extensive tool for network testing and debugging? Well I’m glad you finally asked, because as it turns out, there is, and his name is Charles. Charles Proxy is a cross-platform proxy application that can be used to monitor and manipulate traffic. Go download and install the trial so we can get started.

After starting up Charles you’ll need to configure your device to route its traffic through your computer (unless you’re using the sim, in which case you can skip this part). With your computer and iOS device on the same network, go to your iOS device Settings, then go to Wi-Fi and tap on the blue circle with a white > in it to the right of your network. Scroll to the bottom and under HTTP Proxy, tap Manual. For the Server, enter your computer’s IP address and for the port enter 8888. Close Settings and now your device’s traffic should be going through Charles.

As previously discussed, Network Link Conditioner lacks the ability to specify which traffic you want to throttle; it’s an all or nothing deal. So first, let’s look at Charles’ throttling feature. Go up to the Proxy menu and select Throttle Settings. Check “Enable Throttling” and “Only for selected hosts”. The throttle settings aren’t much different than NLC, but the “Only for selected hosts” option is something new to us. Any hosts added to the list at the bottom will be throttled according to your settings and all other traffic will go through the proxy unthrottled. This makes testing poor network conditions much more tolerable as you can now slow down your app’s traffic while still listening to your Dubstep Nickelback playlist on Pandora uninterrupted. So add whatever hosts you want to throttle to that list. You can easily toggle throttling on and off by pressing ⌘-T at any time. So now that you’re set to test your app on a slow network, let’s have a look at what else we can do with Charles.

By now you might be seeing some URLs appear in the Structure (left) pane of Charles’ main window. These are all the URLs of requests that have gone through Charles so far this session. If your window is still blank, then you must not have much background traffic going on (or you’re not recording in which case, click that record button up top that looks like… well, a record button). Expanding any one of the URLs will show which files on that site are being hit. As you select them, in the right pane you can see more information like the request to the server and the response that came back. If your application is using SSL for its connections, Charles has you covered there too. You’ll just need to go install Charles’ SSL certificates for your computer and for your iPhone (iOS 4 instructions also work on iOS 5 & 6).

Once you have the correct certificates installed, you’ll need to explicitly add all hosts that you want to enable SSL proxying for. While you can just add a wildcard to enable SSL proxying for all hosts, there are a number of websites that won’t play nicely with the type of man-in-the-middle attack Charles uses to make SSL proxying possible. Instead it’s recommended that you explicitly add hosts that you’re actually interested in looking at. You can manually add these hosts under Proxy > Proxy Settings > SSL, or if the host you want to proxy already appears in your list of traffic for this session, you can simply right-click on the host and click SSL Proxying. Now any SSL requests made to that host should show up, and the contents of the request and the response should be visible.

The last feature of Charles that I want to touch on right now is the ability to map to local files. Normally your application will make a request and the server will send it a response. Often times for testing, it’s extremely useful to be able to manipulate the server’s response, especially in apps that rely heavily on data from a server. For example, you might want to verify that your application can handle invalid JSON (I’ve previously run into a 3rd-party JSON parser that crashed when it got invalid JSON), but in testing the server might always give you a valid response. Usually to test this I’ll start by having my application make a normal request and receive a normal response. Then in the Structure pane of Charles, find that request, right-click on it and select Save Response. After saving the server’s response locally, you can edit it to your heart’s content. Once you’ve made whatever edits you want, back in Charles right-click on the request again and now select “Map Local…”. In this dialog you can set the local path for the file that you would like Charles to use (the one you just saved and edited) in place of the server’s response. Now the next time your application makes this same request, Charles will hand it your local file instead. You can use this feature to test for things like making sure your app handles long strings of text, large numbers, or blank values. You know, all those scenarios developers say won’t happen, but they always do. You can manage all the requests you have mapped locally under Tools > Map Local…

So there you have it kids. Charles Proxy is a powerful tool for testing and debugging your applications and their traffic. Hopefully this has helped you get started. The Charles Proxy website also has excellent documentation if you find yourself stuck on something or want to learn more about its other features.

Categories
iOS Networking Uncategorized

Slow Your App’s Roll

Update : As of iOS 6, it is now possible to use Network Link Conditioner directly on the device. Additional details can be found in this post.

Note: After upgrading to Mountain Lion, Network Link Conditioner was not working for me. Steven has pointed out in the comments below that this can be resolved by removing and re-installing the prefpane. Thanks for the tip, steven!

One shortcoming of testing in iOS Simulator is you don’t get to test how your app does in real world network scenarios. The solution? Network Link Conditioner.

Network Link Conditioner is included with Lion’s Developer Tools. You can install it by going to Applications > Utilities > Network Link Conditioner and double clicking the prefpane file. If you don’t see the Network Link Conditioner folder, you can open Xcode, go to the Xcode menu > Open Developer Tool > More Developer Tools…, then grab the Hardware IO Tools for Xcode download (Apple developer account required). Once you have it installed, open up System Preferences and you should see Network Link Conditioner listed at the bottom under Other.

After launching it, you’ll see there is a Profile drop-down that lists a number of preconfigured network scenarios including various 3G and EDGE profiles. If you click on Manage Profiles you can also create your own custom conditions in there to suit any needs you might have (for example, simulating a completely dead network where no traffic gets through). Playing around with my own profiles a bit, I found a pretty good mix with bandwidth set to 85kbps and packets dropped set to 15% for both downlink and uplink. I get a pretty good mix of some things loading and others timing out with those settings.

If you’re using iOS Simulator, you don’t need to do anything special to route your traffic through Network Link Conditioner (except turning it on). However, if you’re testing on a device, you’ll need to proxy your device’s traffic through your computer. The details are beyond the scope of this post, but I will say that I use Charles Proxy for this. I’ll cover the specifics in a later post.

A couple of caveats to note when using Network Link Conditioner. The first is it seems to lock itself about every 5 minutes. So you may find that you frequently need to re-enter your password to turn it on and off while testing. The other drawback worth noting is that Network Link Conditioner is system-wide and has no ability to distinguish between traffic. It doesn’t care about the color of your traffic or the content of its character; it treats all your traffic the same. This means when testing very poor conditions you have to say goodbye to IM, email, loading your ticket tracker, and that sweet dubstep remix you’re playing in the background on YouTube. Obviously this isn’t ideal and I hope that Apple will extend functionality in the future to customize the tool’s reach. It’s for this reason that often times I prefer to use Charles Proxy which has a Throttling feature with similar functionality to Network Link Conditioner, and you can customize which traffic you want it to affect. None-the-less, Network Link Conditioner is a great, easy-to-use, free tool that’s extremely useful in uncovering bugs you may have otherwise missed.

Now that we’ve covered the how, let’s talk a little bit about the why. As shocking as it may be to hear this, cell phones aren’t always connected to a speedy, reliable network. Every thing from a weak signal, to slow public wi-fi, to Sprint’s data network can result in poor network performance for your user and some poor conditions for your app to work under. While you can’t control the quality of the network your users are connected to, you can ensure that your app handles the poor conditions as gracefully as possible. It’s important to use a tool like Network Link Conditioner or Charles Proxy (or a terrible cellular connection) to weed out any bugs that may manifest in these poor conditions and make sure the overall user experience is still a good one.

One big no-no to this will help check for is doing network requests on the main thread. If you’ve ever gotten crash reports with an exception code of 0x8badf00d, you may already be familiar with this problem. Essentially if your app makes network requests on the main thread and it occurs on launch, a slow network could mean your app won’t successfully launch in time and watchdog will kill it before your user even gets it open. This type of issue can be very easy to miss during development and QA because your office wi-fi will likely load things quickly enough to avoid this problem. But as soon as a user in the real world with a poor network tries to use your app, the 1-star reviews will start rolling in.

Once you’ve made sure you don’t see any crashes in your application, turn your attention to the user experience. Even under poor conditions, your application should have some kind of messaging to your users about what’s going on. Failing gracefully is important— in your apps and in life.  A big point of frustration for users can be if your app is loading data (especially if it’s taking a long time) and you’re not conveying that to them in some way. When you’re loading data, tell the user. Using iOS’ network activity indicator icon that’s in the status bar is a good start, but often times it’s beneficial to show a loading indicator within the app, either as an overlay or in the portion of the app where you’ll display the data once it’s loaded.

If your data requests timeout or otherwise fail, once again, make sure you’re telling the user (preferably not with an alert dialog). Tweetbot has an implementation for this that I really like. If your pull-to-refresh fails, you get a nice little notification that slides down from the top to let you know and after a few seconds disappears, not requiring any user interaction and not disruptive to the app’s flow. On a related note, putting a timestamp in your pull-to-refresh bar that says when the last successful update from the server occurred can also be very helpful to users. It’s a simple way for users to see how stale their data is.

Finally, be sure to test bad network conditions on a clean install. Your users may very well be on a bad network the first time they launch your app and not have the luxury of some data already being cached. If your app relies heavily (or entirely) on data requests going across a network, your poor user stuck on a flight with no wi-fi should be able to see something other than completely blank views. Even if your user’s network fails, your app doesn’t have to.