Categories
Design

Why Pull-To-Refresh Isn’t Such a Bad Guy

A couple of weeks ago, Austin Carr wrote a post titled “Why The Pull-To-Refresh Gesture Must Die”. The article is pretty much what the title implies– an explanation of reasons why pull-to-refresh is no longer needed and should go away. Ignoring the overly-aggressive title, the post simply doesn’t make a compelling argument for why we need to abolish pull-to-refresh. At best it offers some reasons why developers may want to reconsider whether or not their app needs pull-to-refresh.

A Different Gesture, A Different Time

The primary reason given for killing pull-to-refresh is that the gesture was designed for a different time – “smartphones are fast and strong enough to auto-refresh.” I’m not sure what Carr means by “strong enough,” but most smartphones are certainly capable of faster connections today than they were a few years ago. Carr goes on to explain that the reason developers can’t drop pull-to-refresh is it’s so universal at this point that users have come to expect it. Finally, Carr quotes Loren Brichter (the creator of pull-to-refresh): “The fact that people still call it ‘pull-to-refresh’ bothers me–using it just for refreshing is limiting and makes it obsolete. I like the idea of ‘pull-to-do-action.'”

With this, Carr argues that the pull-to-refresh gesture needs to evolve, which is the one part I agree with. My problem with the article is the first two parts: arguing that pull-to-refresh is no longer needed and that the reason it still exists is simply because users are used to it.

Not There Yet

The era of slow and unreliable data connections has not passed. Slow data connections are still very much a reality, particularly when you expand your view outside of the US. We can’t assume that all users will be on devices with reliable broadband connections at all times.

The other problem is that pull-to-refresh isn’t just a refresh strategy. Pull-to-refresh is about giving users control. Apps should handle refreshing data in a sensible matter wherever possible. Developers should make informed decisions on which feeds should refresh how frequently, and for the most part this isn’t something users should have to worry about. However, many of us are familiar with the scenario where an app is displaying what appears to be stale data and it’s not immediately clear why. Maybe the app isn’t refreshing like it’s supposed to. Maybe the app isn’t refreshing as frequently as you want it to. Maybe the app tried to refresh, but the connection timed out. Maybe the app tried to refresh, but the server had an error. There are a lot of things that can go wrong when refreshing data, particularly on mobile platforms.

When a user is staring at an app with what appears to be old data, pull-to-refresh is one of the few mechanisms that can give them some control over the situation. Automatic refresh strategies are transparent to users which means when problems occur, no error should be shown to the user (most of the time). Pull-to-refresh is an explicit user action which means if a problem occurs, feedback to the user is warranted and expected. If an app is failing to update in the background, it can silently fail and periodically retry to refresh the data. But if a user notices this, they should be able to manually attempt to refresh the data and if there is an error, see it. Even when data is properly refreshing, pull-to-refresh can offer reassurance to a user who’s not sure if it is. If the most recent tweet I see in Tweetbot in the middle of the day is 20 minutes old, I’m inclined to think my timeline hasn’t refreshed recently. Pull-to-refresh enables me to ensure my timeline is up-to-date, while also providing the perfect place for Tweetbot to display a last updated timestamp.

It would be delightful if apps could instantly show new data in realtime, but we’re not there. Even Carr’s own example of Gmail on the desktop doesn’t do this. Gmail does update in the background, that much is true, but it still refreshes on an interval; a delay still exists between when a new email arrives and when Gmail refreshes and is able to show it. Users can click the refresh button, or click on Inbox to manually refresh it, but by no means are they required to if they’re okay waiting for an automatic refresh, just like how pull-to-refresh works in most iOS apps. Nobody would argue that a user should have to manually refresh any time they want to check for new emails, but it makes perfect sense to leave mechanisms that allow users to refresh manually when they want to.

Moving Beyond Pull-To-Refresh

Carr would like to see more developers experiment with new interactions for swipe down gestures, and I cautiously agree. Pull-to-refresh is one of those ideas that seems so obvious in hindsight, but took a talented engineer to think of it. The brilliance of pull-to-refresh is just how well it fit into the existing design. When users try scrolling past the top of a table cell view, they’re trying to view newer content. Pull-to-refresh intelligently extends that scrolling to have an app refresh the content to load any new data. A perfectly logical and intuitive extension of the existing functionality.

There are a lot of very intelligent developers and designers out there with ideas. Some good ideas, a few brilliant ideas, and a lot of really really bad ideas. We will continue to see pull-to-refresh evolve and adapt. However, there’s a big difference between identifying a need then engineering a solution, and designing new crap for the sake of designing new crap. If you have an idea to improve usability with an interesting gesture, then do it. In the meantime, if you have an app where pull-to-refresh makes sense, there’s no need to shy away from it.
Categories
iOS

iPhone Touchscreen Accuracy – A lesson in understanding test requirements and goals

Effective problem solving requires that you fully understand the problem you’re trying to address. This holds true in life and in programming. Effective testing requires that you have a good understanding of what you are testing and why. Without this solid foundation, at a minimum you’ll cause some confusion, and often times you’ll end up wasting time, money and energy investigating problems that aren’t really problems. This week, a company called OptoFidelity provided the perfect opportunity to discuss this challenge that engineers and testers commonly face.

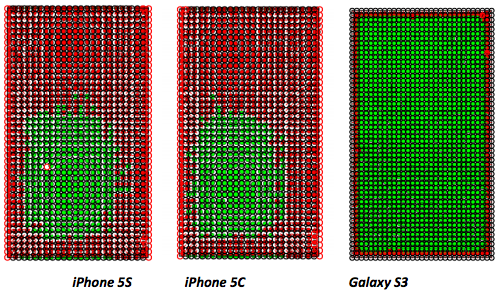
OptoFidelity is a technology company that, among other things, provides automated test solutions. They recently performed a number of automated tests on the iPhone 5c, iPhone 5s, and Samsung Galaxy S3. One of the tests that was carried out is meant to measure the accuracy of a touch panel. This test is performed by a robot which has an artificial finger that performs hundreds of precise taps across the entire display. The location of the tap is compared against where the device registered the tap. If the actual location and registered location are within 1mm of each other, the tap is displayed as a green dot– a pass. If the actual location and registered location differ by 1mm or more, then tap is displayed as a red dot– a failure.

Touchscreen Accuracy Test Results

The image above comes from OptoFidelity and shows the results of the test. As you can see, the Galaxy S3 performs very well in this test, only losing accuracy at the very edge of the display. The iPhones show a somewhat alarming amount of inaccuracy, with roughly 75% of the touchscreen yielding inaccurate results. The obvious conclusion to draw here is that the iPhone 5c and 5s clearly have subpar touchscreen accuracy, at least when compared to the Samsung Galaxy S3. But something sticks out about the iPhone results.

The green area for the iPhone results, where it registered taps within 1mm of the actual tap location, fall into an area that would be easily tappable with your thumb when holding your phone with your right hand. If you pick up your phone with your right hand, and try tapping with your right thumb, it’s easy to see that this area is easy to tap with a fair amount of accuracy. You’re not stretching your thumb as you would when you go for the top of the screen, or scrunching your thumb up too much like you would when trying to tap close to the right edge of the screen. You also wind up tapping with the same part of your thumb while in this area. Put more concisely, this is an area of the screen that you’re more likely to tap exactly where you mean to. So what about where the circles turn red? What’s going on there?

Let’s look at one specific red area that OptoFidelity calls out in their study– the left and right edges of the keyboard.

Keyboard Accuracy

In this image, you can see the results of the touchscreen accuracy test overlaid on the top row of the iOS keyboard. In the center, over letters like T and Y, the black circles of the robot’s tap show green dots nearly centered inside, indicating that the iPhone registered the taps very close to the center of where the tap actually took place. As you move left or right of the center, you see the dots start to shift in the same direction. As you move over to the letters E and W on the left, you see the green dot moving to the left side of the actual tap circle, and by the time you get to Q, the iPhone is now registering taps 1mm or more to the left of where the actual tap took place. The conclusion of the test indicates this is a failure in accuracy on the part of the touchscreen, but is this a failure or a feature?

Looking at the displacement of taps as you move away from the green area, there’s a definite pattern. The more you move away from the easily-tappable area, the greater the “inaccuracy” of the tap. But the inaccuracy skews in a way that would make the target slightly closer to starting position of your thumb (which is likely the most frequently used digit for tapping). As your thumb stretches out from your hand, likely positioned near the bottom of the phone, the portion of your thumb that actually comes into contact with the screen when you tap changes. Your perception of the screen also changes slightly, as when you move higher on the screen, it’s less likely that you’re viewing the screen at exactly a 90 degree angle. These are factors that this automated test does not account for. The robot doing the test is viewing its tap target at a perpendicular angle to the screen. It is also tapping at a perpendicular angle every time. This isn’t generally how people interact with their phones.

I haven’t been able to find official documentation on this, but I think this behavior is intentional compensation being done by Apple. Have you ever tried tapping on an iPad or iPhone while it’s upside-down to you, like when you’re showing something to a friend and you try tapping while they’re holding the device? It seems nearly impossible. The device never cooperates. If the iPhone is compensating for taps based on assumptions about how it is being held and interacted with, this would make total sense. If you tap on a device while it’s upside-down, not only would you not receive the benefit of the compensation, but it would be working against you. Tapping on the device, the iPhone would assume you meant to tap higher, when in reality, you’re upside down and likely already tapping higher than you mean to, resulting in you completely missing what you’re trying to tap.

Commentators across the Internet have already chimed in saying “I’ve noticed this too! I’m always tapping the wrong button!” It’s a touchscreen– you’re going to miss. If the report had revealed the opposite, that the Galaxy S3 was inaccurate, you would have had a swarm of S3 users also supporting the study, citing that they sometimes tap the wrong button or key. The bottom line is, the testing performed here bears no resemblance to real-world usage. OptoFidelity tested how closely each device maps a tap to the actual position of the tap. This accuracy would be extremely important if you had robot fingers tapping very small and close tap targets at a 90 degree angle. If you’re looking for a phone to use this way, steer clear of the iPhone. What the test didn’t show is the accuracy of taps on a device relative to a user’s intended tap target. I would not be surprised if this was exactly the sort of testing Apple did when they decided to skew the touch accuracy of their devices.

This comes up in testing all of the time. In order to properly test something, you need to understand what it is that you’re testing. If you don’t understand what you’re testing, then it’s easy to misinterpret the results. Every tester out there has filed a bug, only to have it explained to them why it’s actually the expected behavior for an app (and not in the joking “it’s not a bug, it’s a feature” kind of way). A critical part of our jobs as testers is not just reporting what something does, but asking why it behaves that way. Consider this real world example. You come across a light switch that when flipped down, the lights are on, and when flipped up, the lights are off. It could be that the switch was installed upside-down. Or it could be that it’s a three-way switch and there’s another switch elsewhere that controls the same lights. In the latter case, the behavior of the switch could not be considered a bug. Arriving at that conclusion requires an understanding of what you’re testing in order to know the expected result.

I could be completely wrong about the accuracy of the iPhone. I am not a touchscreen expert, and have no proof to show what’s going on. I am in no better position than OptoFidelity to make claims about the accuracy of the iPhone touchscreen. My point is that they should be asking questions. Testers should always ask questions. Testers and engineers should always ask questions. By asking questions and trying to look below the surface, you gain a better understanding of the problems you’re trying to solve and the original questions you were trying to answer. As developers and testers, asking questions is how we build better products and yield the best results.

Categories
iOS

360iDev 2013 – How to Break Your Apps Before I Do

I had the wonderful opportunity to speak at 360iDev this year. My talk, entitled How to Break Your Apps Before I Do, covers some of the methods and mentality of a good QA person, as well as how developers can get the most out of testing.

The conference organizers, John and Nicole Wilker, have generously decided to make the session recordings available to everybody for free this year. Those interested can check out the recording of my talk, as well as all of the other sessions.

The slide deck is also available.

Categories
iOS

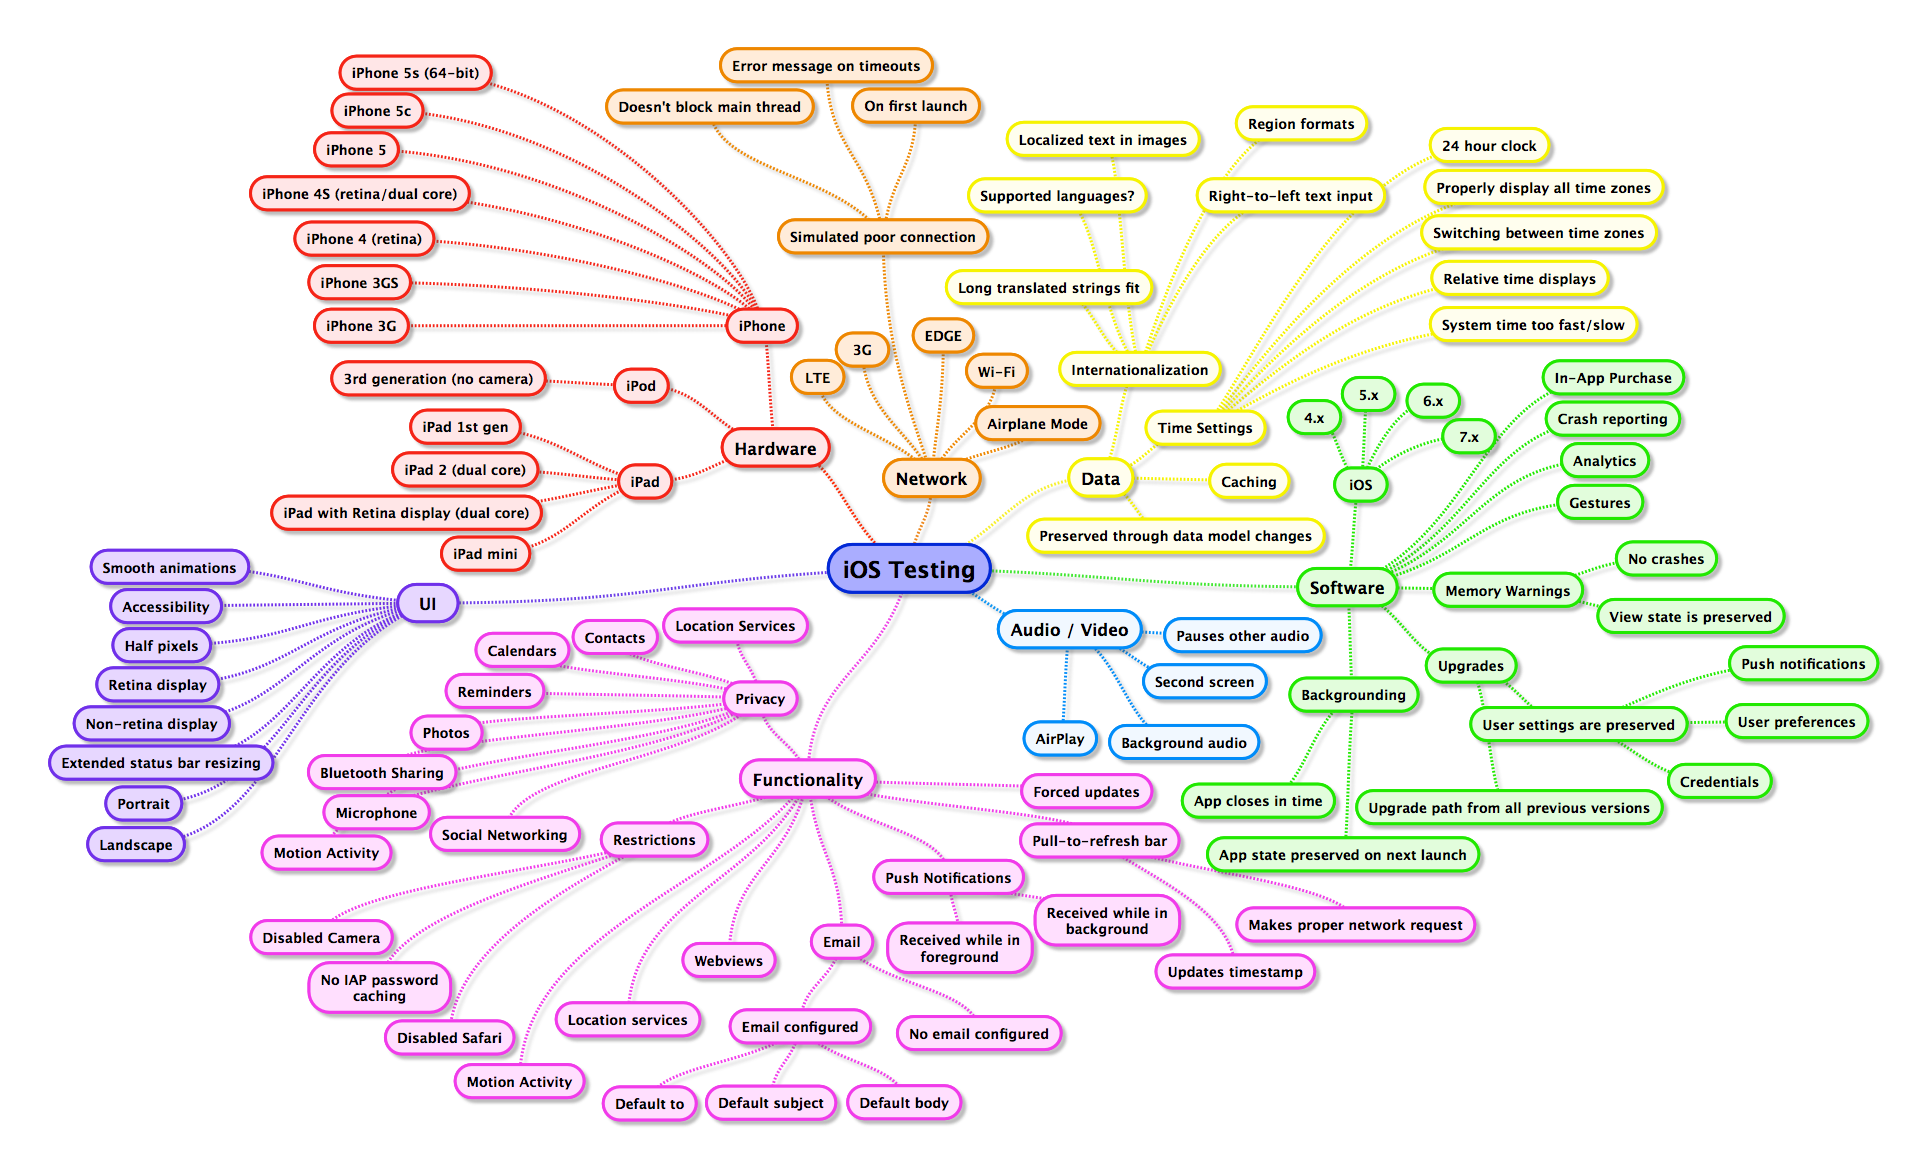
iOS Testing mind map 1.2 – Now with more stuff

Nearly a year since the last refresh of the iOS testing mind map, it seemed due for an update. The changes in this version are outlined below.

  • Hardware
    • Added iPhone 5s (64-bit)
    • Added iPhone 5c
    • Removed iPhone 3G
  • Network
    • Added LTE
  • Date
    • Time Settings
      • Added 24 hour clock
  • Software
    • iOS
      • Added 7.x
  • Functionality
    • Added Motion Activity
    • Added Restrictions
      • Added Disabled Safari
      • Added No IAP password caching
      • Added Disabled Camera
    • Added Privacy
      • Added Location Services, Contacts, Calendars, Reminders, Photos, Bluetooth Sharing, Microphone, Motion Activity, and Social Networking
    • Added Push Notifications

iOS Testing Mind Map 1.2

iOS Testing Mind Map 1.2

Once again, this mind map seeks to be thorough without getting so detailed as to become unmanageable or unhelpful. The mind map is not exhaustive, but helps serve as a template that you can customize to suit the needs of your apps. Anyone wishing to modify the mind map can do so by downloading SimpleMind Free and the SMMX mind map file (you may need to right-click to save), then dragging the file onto the SimpleMind app icon in your dock. Clicking on the image above will take you to a full-resolution PNG. You can also download this zip file which contains PDF, PNG, text, OPML, MM and SMMX versions of the mind map.

Categories
Security

Evaluating the Security of Hosted Build Servers

A few weeks back there was an abuse of Apple’s Enterprise Developer Program that gathered a lot of attention after it was used to distribute a GameBoy emulator outside of the App Store. Obviously the focus at the time was on the fact that anybody could build an app to distribute outside of the App Store by using one company’s enterprise certificate. What got no attention, as far as I can tell, was the lack of security on the build server.

Enterprise Abuse

MacBuildServer.com had previously stated that their goal was to make open source iOS projects more accessible to developers and users. Their service allowed a user to enter the URL of an iOS GitHub project and out the other end they would get an IPA that they could install on their devices. Developers had the option of providing their own certificate to sign the app with, but if they didn’t have one they could just use MacBuildServer’s enterprise certificate. Most developers would probably agree that this isn’t a great idea as it’s a glaring violation of Apple’s terms of use. In fact, as most could probably have predicted, it wasn’t long before Apple revoked the company’s enterprise certificate, leaving any apps that had been signed with it completely dead. In response, MacBuildServer changed their service to instead require a developer to provide their own certificate to sign the app with. End of story, right?

Secrets of an Error Log

Not quite. When my boss, Jay Graves, went to try out MacBuildServer his build failed as a result of a required variable that had not been set. When a build fails in Xcode, you’ll get output telling you what went wrong so you can try and fix it. Many continuous integration servers, like Jenkins for example, will give you console output from the entire build process so you can see everything that took place and any contributing factors that may have led up to the build failure, as well as the error that ultimately caused it to fail. MacBuildServer provides the same. If a build fails, you’ll get the option to view the error log. One of the first things Jay noticed was at the top of the log, the build server had echoed out the password for the certificate that the server was signing with. We had a laugh about it, but without the certificate itself the password doesn’t do you much good. But what if we could get the certificate?

I created an empty application in Xcode. In my project settings, I navigated to the Build Phases tab for my target. Under this tab you’ll find an item called “Run Script”. This does exactly what you might expect; it will execute any commands you enter as part of a shell script during the build process. I started off with a simple whoami just to see if it would work. I followed this with a non-existent command in order to guarantee my build would fail right after my script had run so I could see the output. I uploaded my sample project to GitHub, pointed MacBuildServer to it, chose the option to sign with their enterprise certificate and as expected, my build failed. When I clicked to view the error log I was given the server’s output from my build and at the end of it was the output from my whoami command showing me the user that the build had been run by.

The output of whoami wasn’t terribly interesting, but what it represented was rather significant. At this point it’s pretty much game over for the build server. I have the ability to run any command that I could as a normal user logged in to the computer. The build failure logs told me everything I needed to know about where the enterprise certificate and corresponding keychain were being stored. Combine this with the certificate password that the build log is already giving and you now have the ability to locally sign any app you want with this company’s enterprise certificate. Of course this is less meaningful now that the certificate has been revoked. However, you could also run any number of other commands to cause harm to the build server or use access to the server to launch other attacks from inside their network. From navigating the filesystem, to copying files, to tampering with other people’s git repos, the possibilities are just about endless. I promptly contacted MacBuildServer about this problem and they have since disabled scripts from Build Phases and Build Rules.

What It Means for Users

While this seems like a lesson for administrators of hosted build servers, this should also serve as a warning to users. Using a hosted build server requires that you trust a third-party with your code, all of your signing credentials, as well as trusting that the IPA you get out the other end has not been tampered with. In the case of this particular service, the GitHub repository you use has to be public, but a number of other hosted build server solutions will build from private repositories. If the server you entrust isn’t properly secured, you may unwittingly be giving access to your code to a malicious party.

Of course, this is true of any third-party service. We often hand sensitive information over to a third party and trust that they have properly secured their services to protect our information. But build servers may inherently have a greater risk of being exploited. The very nature of a build server requires that it downloads remote code that is controlled by a user. Usually this is exactly the kind of action that you would want to try and prevent your users from doing on your servers.

Additionally, build servers are usually set up in trusted environments. When an organization sets up a build server internally, it usually has a trusting nature because the need for convenience outweighs security needs. A build server hosted inside of an organization, on a private network, to compile and run code that was written by developers who work for that company will naturally have less need for security than a build server accessible from the Internet to anybody who wants to sign up for a free account. If you’re building the latter, a fair amount of work will need to go into locking down the build server to limit access; that’s not the environment they’re usually set up for. It’s not impossible, but you need to know what you’re doing.

The Takeaway

All of this is to not say that hosted build servers should not be used. Developers should simply be aware of the potential risk involved when trusting a third party like this. Similarly, anybody offering hosted build servers as a service should be aware of the risk involved, and be familiar with the security measures necessary to protect themselves and their users.

This post should also not be construed as a strict criticism of MacBuildServer. When I contacted MacBuildServer about the issues I had found, they were receptive and appreciative to my feedback and promptly addressed the issue. I have not taken the time to investigate other hosted build server solutions, but I would be surprised to learn that other services don’t suffer from their own security problems.

Special thanks to Carl Veazey for his help in Xcode and eternal willingness to answer my stupid questions.

Categories
iOS

Vesper Beta Collaboration

Just about every beta I’ve participated in has been set up in a way that feedback is only sent back to the developers. Vesper is my first time on a beta where a collaboration tool was set up for testers, in this case Glassboard. For those unfamiliar with Glassboard, it’s a sort of social network that allows you to create private boards for groups of people to communicate. Its lightweight structure is well-suited for private communications amongst a small group, like during a beta. Brent Simmons explained to me that this is how he has always done betas. Whether it be email, Glassboard, or some other tool, Brent has always set up a way for testers to discuss the project with one another.

Not long after the first beta release, the Vesper Glassboard began to fill with feature requests, design feedback, and general comments. It was interesting to watch all the discussion taking place around design, features, and interactions, but my specialty has always been breaking things, so that’s what I did. This took an interesting turn one night after I emailed a list of about 20 bugs I had found in my latest run through the app. Dave responded with “How about I save myself the time and just give you Lighthouse access?”

This didn’t just make things easier on him, but easier for me too. Glassboard is a great collaboration tool, but by no stretch of the imagination was it set up to be a bug tracking tool. With direct access to Lighthouse I could open tickets for bugs as I found them, rather than trying to compile a large list of items to submit at once. It also let me better detail my tickets, as well as attach photos and videos for bugs that were more difficult to explain. Lighthouse access also meant that I could make sure everything reported by testers on Glassboard got tracked. Not to mention how much easier it made it to follow up on bugs once they were fixed.

The difference between a bad app and a good app is apparent to most. The difference between a good app and a great app is much more subtle. It’s the small details that 99% of users wouldn’t consciously notice were missing if they weren’t there. It’s the one or two out-of-place pixels that will cause a slight distraction to a user’s mind, even if they never realize it. I love helping with that refinement. Producing a seamless app that allows people to forget that what they’re actually looking at is software executing thousands and thousands of lines of code in order to display a sequence of colors onto millions of pixels that make up a screen. Creating that suspension of disbelief where users interact with an app as if it’s actually made up of physical components. Q Branch wants to ship the absolute best apps that they can, and I’m thrilled and honored to be a part of that.

Categories
iOS iOS Simulator Location Services

Spoofing Location Services in Your iOS Apps

Of all the instruments available on the iPhone, GPS is easily one of the most utilized. Having access to Location Services can greatly enhance user experience in your app by adapting behavior to what best suites your user based on his or her whereabouts. One critical piece to utilizing location services is making sure your code behaves the way you expect. Fortunately, in recent releases of Xcode, Apple has made this job a little bit easier by allowing us to spoof our location in the Simulator and on devices.

The way you decide to utilize Xcode’s location spoofing will depend on how your app will use it. For example, if you’re making a gorgeous weather app for the iPad, you’ll want to spoof a static location to simulate getting a user’s local weather. On the other hand, if your app does something like map a user’s bike ride, you’ll need to spoof a set of locations that simulate a user’s location changing over time. Xcode has some presets you can use for both scenarios, but more than likely you’ll want to construct your own custom data to feed to Xcode.

First, you will create a GPX file. GPX is a standard file format used for expressing GPS locations. The format for GPX files that Xcode looks for is fairly straightforward:

<gpx>
    <wpt lat="38.897678" lon="-77.036517"></wpt>
</gpx>
This GPX file gives the latitude and longitude for The White House. Throw that text into a text editor, and save it as WhiteHouse.gpx. In Xcode, open a project you have for an iPhone or iPad app, and build it to your device. Once the app is running on your device, go to Product > Debug > Simulate Location, and select the last option in the list that says “Add GPX File to Project…“, then select the WhiteHouse.gpx file we just created. Xcode will pop up some options for adding the file; the defaults should be fine, so just click on Finish. Now, if you go back to Product > Debug > Simulate Location, you should see WhiteHouse near the top of the list; click on it (you can also get to this list from the debug bar at the bottom of Xcode, just click on the location services arrow icon). Your device should now think you’re at the White House. To check, press the home button on your device to close your app and go to Maps app. If it didn’t seem to work, check Xcode and make sure the location arrow in the debug bar is blue. If it’s still gray, Xcode doesn’t like something about your GPX file.

One thing you might be wondering now is if Maps uses your simulated location, will other apps use it also? The answer is yes. Think about all the apps you have and what they are using location services for. Twitter clients posting your location with tweets, sports apps using your location to black out games, camera apps that put your location into Exif data, apps like Foursquare that check you into places – they will all look at your simulated location. I won’t go into detail here, but you should play around with this; it can be interesting.

Visiting the White House was fun, but what if you are making an app for people to track their sweet rollerblade workouts? You will need to make a GPX file with multiple location points. The format is the same but with more wpt elements that have additional latitude and longitude coordinates. I found a GPX file for the New York City Marathon here but had to make some modifications for Xcode to like it. Grab the modified file here. Click on the location button in the debug bar of Xcode, and select “Add GPX File to Project…” again. Point it to your New York City Marathon file, and accept the defaults as before. Finally, click the location button again, and select New York City Marathon from the list. Now, if you go back into Maps, you should see your blue dot making its way through the New York City Marathon; every rollerblader’s life ambition.

We’ve had quite a day so far. Any developer or tester would be exhausted after visiting The White House and rollerblading the New York City Marathon, so I won’t keep you much longer; just one more thing to show. With your app still running in Xcode, unplug your device (I will not be held responsible for any bootstrap errors that result). If you go back into Maps, you’ll find your rollerblader is stuck hanging out in New York. If you don’t stop your app in Xcode before unplugging your device, your device will continue to use the simulated location until you restart it, or until you plug it back in and turn off the location simulation. This is extremely handy for testing without being tethered to your computer. However, this can also be confusing for your mom when she sees your Facebook post from Antarctica, so don’t forget to turn it off when you have finished playing.

Hopefully, Apple will eventually give us the ability to control how quickly Xcode advances through the file. Maybe if we’re really lucky, they’ll give us a way to easily generate GPX files, or let us just specify a location without the need to create a GPX file. In the meantime, Location Simulation, while requiring a little bit of hands on work, is an extremely handy tool for testing location services in your app.

Update: For some additional information on this topic check out this article from Brandon Alexander, an iOS developer at Black Pixel. He has links for some handy tools and also covers an alternate way to enable location simulation using schemes.

Categories
iOS iOS Simulator

Testing with the Extended Status Bar

iOS Simulator comes with a number of debug options to assist you in testing your iPhone and iPad apps. Two of of my favorite and most used options are found near the bottom of iOS Simulator’s Hardware menu: Simulate Memory Warning and Toggle In-Call Status Bar. We haven’t yet covered the in-call status bar and it’s often and overlooked and under-tested scenario that deserves some attention.

Toggle In-Call Status Bar simply enables the double-height status bar that users would normally see when they are on a call outside of the phone app. The extended status bar also appears with other background processes like tethering, voice recordings, Garage Band recordings, and Skype calls, among others. Because of the increasing number of apps that will cause this extended status bar to appear, it’s becoming more and more likely that your users will be using your app in such a scenario, and therefore increasingly important that you test for such scenarios.

There are a few different scenarios for testing the extended status bar in each view: turning on the extended status bar while you’re in a view, turning it on prior to going into a view, disabling it while you’re in a view, and disabling it while you’re out of a view. Just because a view handles one of these properly doesn’t mean it will look good in all of these scenarios. Getting familiar with the ⌘-Y shortcut to enable and disable the extended status bar will help this testing go pretty quickly.

For most apps the main thing to look for when enabling the extended status bar is checking to make sure you can still scroll to the bottom of the view and nothing is being cut off. Another bug that commonly manifests is having a blank area at the top or bottom of the view that shows up when turning off the extended status bar. While many users may never even encounter these scenarios while using your app, those who do will appreciate your attention to detail if you handle these scenarios properly. Even if they don’t notice, at least they won’t be leaving you a one star review for bugs like having the back button half covered by the status bar.

Categories
iOS Tools

The Real Value of Panic’s Status Board

Today Panic announced the release of their new iPad app, Status Board. I was fortunate enough to have the opportunity to spend some time with it before its release and I can confirm what most of you probably already anticipate; it’s a phenomenal app. I’ll spare you another review, because there are already great ones to be read elsewhere. But there are a couple of features in Status Board that I wanted to talk about. Ones that I think have a tremendous amount of value and potential.

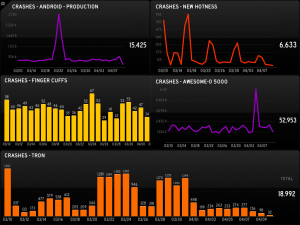
The first feature that I’m really excited about is HockeyApp integration. One of the widgets available in Status Board is a custom graph. HockeyApp has made it incredibly simple to pass URLs from Hockey to Status Board which will feed your widget the data necessary to chart a graph of your crash numbers. You can fit up to 6 different graphs comfortably in Status Board’s landscape orientation, and up to 8 in portrait. I’m hopeful that daily crash numbers are just the beginning. The HockeyApp API offers a lot of useful data, and the data you can graph in Status Board is really only limited by what people decide to make scripts for. This leads me to the second thing that I’m excited about.

IMG_0083

Status Board also has widgets for custom tables and do-it-yourself panels. Combined with the custom graph widget, there are countless possibilities for the data and information to be displayed in Status Board. I have a suspicion (or possibly more of a hope) that a lot of users will quickly see different scenarios and opportunities to create scripts that will populate interesting and useful data for various widgets. Maybe the number of builds they have each day, or GitHub pushes, or Pivotal velocity, or bugs closed in Lighthouse. The list goes on and on. I’ve already seen a number of people on Twitter getting excited just thinking about the possibilities. As developers create tools to generate data for their own widgets, I hope they’ll be kind enough to share them with others. Before long we may have a laundry list of tools that you can use to create entertaining and helpful widgets for your status board.

So with that, I encourage you to go check out Status Board if you haven’t already, and get cracking on one of the first must-have dataset generators for Status Board.

Update: Chris Patterson has already gotten the ball rolling over here.

Categories
iOS

Goalie: The Native iPhone HockeyApp Client

Wonderful news in the HockeyApp community today. Brian Gilham and Mark Pavlidis have released their native HockeyApp client for iOS: Goalie. HockeyApp is a platform for managing your apps. It offers everything from beta management to crash reporting and has become an indispensable tool for many developers and testers in the iOS community (and elsewhere) including myself. If you haven’t checked HockeyApp out yet, you should.

HockeyApp offers a web clip (a web page with an icon on your home screen), but the functionality is pretty limited. Goalie is the first native iOS client for HockeyApp. For testers it offers similar functionality to the web clip, allowing you to install your available apps. For developers it offers many more features for managing betas including viewing crash reports, handling user feedback, adding new apps, viewing analytics and managing your teams.

While the app is free, you’ll want to buy the in-app purchase to unlock all of the features for managing betas; it’s well worth the price. For anybody who uses HockeyApp on any sort of regular basis, this is a must-have app.

iTunes Link