Categories
iOS iOS Simulator Location Services

Spoofing Location Services in Your iOS Apps

Of all the instruments available on the iPhone, GPS is easily one of the most utilized. Having access to Location Services can greatly enhance user experience in your app by adapting behavior to what best suites your user based on his or her whereabouts. One critical piece to utilizing location services is making sure your code behaves the way you expect. Fortunately, in recent releases of Xcode, Apple has made this job a little bit easier by allowing us to spoof our location in the Simulator and on devices.

The way you decide to utilize Xcode’s location spoofing will depend on how your app will use it. For example, if you’re making a gorgeous weather app for the iPad, you’ll want to spoof a static location to simulate getting a user’s local weather. On the other hand, if your app does something like map a user’s bike ride, you’ll need to spoof a set of locations that simulate a user’s location changing over time. Xcode has some presets you can use for both scenarios, but more than likely you’ll want to construct your own custom data to feed to Xcode.

First, you will create a GPX file. GPX is a standard file format used for expressing GPS locations. The format for GPX files that Xcode looks for is fairly straightforward:

<gpx>
    <wpt lat="38.897678" lon="-77.036517"></wpt>
</gpx>
This GPX file gives the latitude and longitude for The White House. Throw that text into a text editor, and save it as WhiteHouse.gpx. In Xcode, open a project you have for an iPhone or iPad app, and build it to your device. Once the app is running on your device, go to Product > Debug > Simulate Location, and select the last option in the list that says “Add GPX File to Project…“, then select the WhiteHouse.gpx file we just created. Xcode will pop up some options for adding the file; the defaults should be fine, so just click on Finish. Now, if you go back to Product > Debug > Simulate Location, you should see WhiteHouse near the top of the list; click on it (you can also get to this list from the debug bar at the bottom of Xcode, just click on the location services arrow icon). Your device should now think you’re at the White House. To check, press the home button on your device to close your app and go to Maps app. If it didn’t seem to work, check Xcode and make sure the location arrow in the debug bar is blue. If it’s still gray, Xcode doesn’t like something about your GPX file.

One thing you might be wondering now is if Maps uses your simulated location, will other apps use it also? The answer is yes. Think about all the apps you have and what they are using location services for. Twitter clients posting your location with tweets, sports apps using your location to black out games, camera apps that put your location into Exif data, apps like Foursquare that check you into places – they will all look at your simulated location. I won’t go into detail here, but you should play around with this; it can be interesting.

Visiting the White House was fun, but what if you are making an app for people to track their sweet rollerblade workouts? You will need to make a GPX file with multiple location points. The format is the same but with more wpt elements that have additional latitude and longitude coordinates. I found a GPX file for the New York City Marathon here but had to make some modifications for Xcode to like it. Grab the modified file here. Click on the location button in the debug bar of Xcode, and select “Add GPX File to Project…” again. Point it to your New York City Marathon file, and accept the defaults as before. Finally, click the location button again, and select New York City Marathon from the list. Now, if you go back into Maps, you should see your blue dot making its way through the New York City Marathon; every rollerblader’s life ambition.

We’ve had quite a day so far. Any developer or tester would be exhausted after visiting The White House and rollerblading the New York City Marathon, so I won’t keep you much longer; just one more thing to show. With your app still running in Xcode, unplug your device (I will not be held responsible for any bootstrap errors that result). If you go back into Maps, you’ll find your rollerblader is stuck hanging out in New York. If you don’t stop your app in Xcode before unplugging your device, your device will continue to use the simulated location until you restart it, or until you plug it back in and turn off the location simulation. This is extremely handy for testing without being tethered to your computer. However, this can also be confusing for your mom when she sees your Facebook post from Antarctica, so don’t forget to turn it off when you have finished playing.

Hopefully, Apple will eventually give us the ability to control how quickly Xcode advances through the file. Maybe if we’re really lucky, they’ll give us a way to easily generate GPX files, or let us just specify a location without the need to create a GPX file. In the meantime, Location Simulation, while requiring a little bit of hands on work, is an extremely handy tool for testing location services in your app.

Update: For some additional information on this topic check out this article from Brandon Alexander, an iOS developer at Black Pixel. He has links for some handy tools and also covers an alternate way to enable location simulation using schemes.
Categories
iOS iOS Simulator

Testing with the Extended Status Bar

iOS Simulator comes with a number of debug options to assist you in testing your iPhone and iPad apps. Two of of my favorite and most used options are found near the bottom of iOS Simulator’s Hardware menu: Simulate Memory Warning and Toggle In-Call Status Bar. We haven’t yet covered the in-call status bar and it’s often and overlooked and under-tested scenario that deserves some attention.

Toggle In-Call Status Bar simply enables the double-height status bar that users would normally see when they are on a call outside of the phone app. The extended status bar also appears with other background processes like tethering, voice recordings, Garage Band recordings, and Skype calls, among others. Because of the increasing number of apps that will cause this extended status bar to appear, it’s becoming more and more likely that your users will be using your app in such a scenario, and therefore increasingly important that you test for such scenarios.

There are a few different scenarios for testing the extended status bar in each view: turning on the extended status bar while you’re in a view, turning it on prior to going into a view, disabling it while you’re in a view, and disabling it while you’re out of a view. Just because a view handles one of these properly doesn’t mean it will look good in all of these scenarios. Getting familiar with the ⌘-Y shortcut to enable and disable the extended status bar will help this testing go pretty quickly.

For most apps the main thing to look for when enabling the extended status bar is checking to make sure you can still scroll to the bottom of the view and nothing is being cut off. Another bug that commonly manifests is having a blank area at the top or bottom of the view that shows up when turning off the extended status bar. While many users may never even encounter these scenarios while using your app, those who do will appreciate your attention to detail if you handle these scenarios properly. Even if they don’t notice, at least they won’t be leaving you a one star review for bugs like having the back button half covered by the status bar.

Categories
iOS Tools

The Real Value of Panic’s Status Board

Today Panic announced the release of their new iPad app, Status Board. I was fortunate enough to have the opportunity to spend some time with it before its release and I can confirm what most of you probably already anticipate; it’s a phenomenal app. I’ll spare you another review, because there are already great ones to be read elsewhere. But there are a couple of features in Status Board that I wanted to talk about. Ones that I think have a tremendous amount of value and potential.

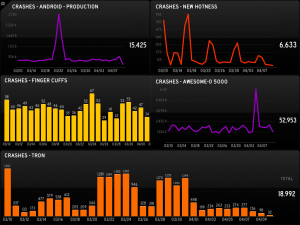
The first feature that I’m really excited about is HockeyApp integration. One of the widgets available in Status Board is a custom graph. HockeyApp has made it incredibly simple to pass URLs from Hockey to Status Board which will feed your widget the data necessary to chart a graph of your crash numbers. You can fit up to 6 different graphs comfortably in Status Board’s landscape orientation, and up to 8 in portrait. I’m hopeful that daily crash numbers are just the beginning. The HockeyApp API offers a lot of useful data, and the data you can graph in Status Board is really only limited by what people decide to make scripts for. This leads me to the second thing that I’m excited about.

IMG_0083

Status Board also has widgets for custom tables and do-it-yourself panels. Combined with the custom graph widget, there are countless possibilities for the data and information to be displayed in Status Board. I have a suspicion (or possibly more of a hope) that a lot of users will quickly see different scenarios and opportunities to create scripts that will populate interesting and useful data for various widgets. Maybe the number of builds they have each day, or GitHub pushes, or Pivotal velocity, or bugs closed in Lighthouse. The list goes on and on. I’ve already seen a number of people on Twitter getting excited just thinking about the possibilities. As developers create tools to generate data for their own widgets, I hope they’ll be kind enough to share them with others. Before long we may have a laundry list of tools that you can use to create entertaining and helpful widgets for your status board.

So with that, I encourage you to go check out Status Board if you haven’t already, and get cracking on one of the first must-have dataset generators for Status Board.

Update: Chris Patterson has already gotten the ball rolling over here.

Categories
iOS

Goalie: The Native iPhone HockeyApp Client

Wonderful news in the HockeyApp community today. Brian Gilham and Mark Pavlidis have released their native HockeyApp client for iOS: Goalie. HockeyApp is a platform for managing your apps. It offers everything from beta management to crash reporting and has become an indispensable tool for many developers and testers in the iOS community (and elsewhere) including myself. If you haven’t checked HockeyApp out yet, you should.

HockeyApp offers a web clip (a web page with an icon on your home screen), but the functionality is pretty limited. Goalie is the first native iOS client for HockeyApp. For testers it offers similar functionality to the web clip, allowing you to install your available apps. For developers it offers many more features for managing betas including viewing crash reports, handling user feedback, adding new apps, viewing analytics and managing your teams.

While the app is free, you’ll want to buy the in-app purchase to unlock all of the features for managing betas; it’s well worth the price. For anybody who uses HockeyApp on any sort of regular basis, this is a must-have app.

iTunes Link

Categories
iOS Privacy

The Truth About Apple’s “Limit Ad Tracking” Feature

Discussions have been taking place for a long time about Apple’s deprecation of UDIDs, what options developers have for replacing their use, and what it means for user privacy. Since Apple has now officially announced that developers can no longer use UDIDs as of May 1st, it seemed worth taking a closer look. What I found when looking into Advertising IDs, identifiers for vendors (IDFVs), and the “Limit Ad Tracking” feature that Apple added in iOS 6 was a lot of confusion and misinformation about how all of these things worked. To try and bring some clarity to the issue, I decided to do a detailed write-up on Double Encore’s website. The explanation is geared more toward end users, but I think even more technical folks may gain some insight from it.

Huge thanks to Doug Russell for the sample app he provided that let me explore how Advertising IDs and IDFVs work.

Categories
iOS Security

Trusting the Client

A lesson learned a long time ago in the world of desktop computing is that a server can’t trust what a client tells it. If a user goes to log in to your server, your server checks it, you would never leave it up to the client-side application to tell you the user is authenticated because you wouldn’t know if it’s telling the truth. You have control over your server and how it behaves, which is why it should be left in charge of making important decisions, and providing the client with just enough data to execute on those decisions.

This lesson is still being learned in the mobile world. One of the latest examples is Simple Bracket; a very nicely designed iOS app for choosing your March Madness bracket. When playing around with Simple Bracket, a couple of things jumped out at me. The first is if you sniff the app’s traffic, you can see that when searching for Pools, the server responds with a data for a list of matching pools, including their PIN. This seems to allow the app to quickly, and cleanly either accept or reject your PIN when you try to join a pool. The obvious downside to the client side checking here, is anybody can see the PIN for any pool, rendering the PIN completely useless.

The second thing I noticed is the way Simple Bracket determines when it should show certain data. Currently if you go to view another user, the app tells you that you won’t be able to see their bracket until March 21st, when March Madness begins and brackets are locked. This data is kept private from other users so that nobody can copy somebody else’s bracket. Normally in a situation like this, you would want to have the server be the one to determine when this data should be displayed, and not make the data available to the client until that time. In Simple Bracket they decided to let the client determine when to show this data and the server seems to happily provide it to the client. As such, by simply changing your device’s date to March 21, 2013, you can see anybody’s current bracket.

This is just one more example in a trend we see where many developers view iOS as a closed system that they can trust, and it’s not. As mobile platforms mature and develop, we should be cautious to not repeat the same mistakes that were already made on other platforms. There’s no need to repeat these mistakes and endure the same pain and consequences rather than learning and growing from the past.

Categories
iOS Security

Award for most ironic Appy Award goes to Fandango

Congratulations to all of those who won Appy Awards this year. A very special shout-out to Fandango who somehow won an Appy for Mobile Payments, despite not properly securing customer credit card information. Fandango’s app allows self-signed SSL certificates; combine this with the fact that they transmit all of your credit card details in plaintext (though over an HTTPS connection) when you check ticket availability, and it’s a bit ironic that they would win an award for this category. More than two months after being contacted about these issues, they have yet to respond or do anything to try and secure their customer info. Well done, Fandango.

Update 3/17/13: As reader iOSSneak points out below in the comments, Fandango seems to have fixed the SSL issue in version 5.5.1 of the Fandango app, which was released the day after this post. The Fandango app no longer accepts self-signed SSL certificates.

Related post: iPhone Apps Accepting Self-signed SSL Certificates

Categories
iOS Security Uncategorized

Escrow Keybags and the iOS 6 lock screen bug

There was a lot of fuss last week about an alleged iPhone lock screen bug that allowed an attacker to bypass the lock screen and access your iPhone’s filesystem. I wrote an article on iMore explaining that this wasn’t the case and the confusion seemed to be the result of a misunderstanding on how iPhone passcodes work.

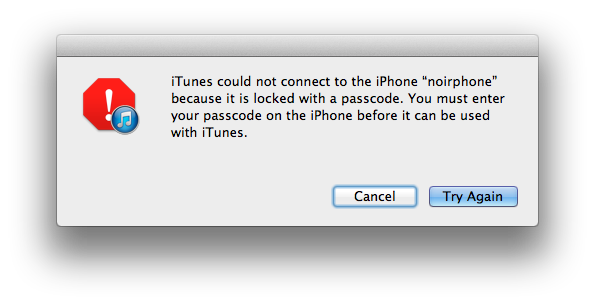
As mentioned in the article, when an unlocked iPhone is plugged in to a computer with iTunes running (or a locked phone that you then enter the passcode on), iTunes has a mechanism that allows it to access the device’s filesystem in the future without requiring the user to enter their passcode. I ambiguously referred to this “mechanism” because I had absolutely no clue how it worked. All I knew is that the first time you plug a locked device in to a computer, iTunes will give you an error message. However, once you enter the device’s passcode, iTunes will never prompt you again to enter it on that computer. Whether the phone is locked or not, iTunes (and any other app that can talk to your iPhone) will gladly read files from the device and write new data to it.

Twitter user Hubert was kind enough to send me more info about this process. He sent me an article that looks at how iOS 5 backups work. The article briefly explains the use of Escrow Keybags by iTunes (technically I think usbmux is what uses them) to talk to locked devices after they have been unlocked once. The gist seems to be that there are certificates and keys which are exchanged via iTunes when an iPhone is plugged in and unlocked, which are then stored in an Escrow Keybag on the host computer. The Escrow Keybag for every device you’ve ever plugged in to your machine can be found in /private/var/db/lockdown and is named with the UDID for the device that it is for. When a device is plugged in to your computer in the future, this Escrow Keybag is used to unlock the device without the need for the user to enter the passcode.

The confusion on the alleged lock screen bypass bug came from this. The bug discovered simply made the screen go black with a status bar still visible. If you plugged this device in to a computer that it had previously been plugged in to while unlocked, the computer used the Escrow Keybag in order to read the file system without needing the passcode. This would have happened with or without causing the black screen glitch. If the person who found the glitch had plugged their iPhone into a computer that it had never been connected to, they would have gotten an error from iTunes saying that the device was locked and they would need to enter their passcode.

The original video demonstrating the bug can be found here. A video of the same bug being reproduced, but with the phone plugged in to a computer it has not been unlocked with before can be seen here. My sincerest apologies that I don’t have any block rocking beats accompanying my video.

Categories
iOS

360iDev min & NSBrief

It has been a busy and exciting week. I was lucky enough to get to attend and speak at 360|iDev min in Las Vegas earlier this week. Big thanks to John Wilker for another great conference.

Saul Mora was also kind enough to have me on his podcast, NSBrief, and we talked about QA stuff (shocking, I know). You can check out the episode here.

Categories
Design iOS

Handling Empty App States

A common scenario that I encounter on nearly every (if not all) projects is how to handle views that lack any data to display. Craig Dennis has a nice post that draws some attention to these often overlooked app states.

The manifestation I most frequently run into are views populated with server-side data when either there is no network connection, or there’s a slow network connection and as a result, no data to immediately display. Paying attention to these situations that users will inevitably encounter is a great way to delight users where they would otherwise just find disappointment.

Source: Dave Wiskus